Showing posts with label veggies. Show all posts
Monday, February 27, 2012
Secret Recipe Club: Rutabaga Chips - Low Carb, Too!
Do you know what a rutabaga is? Do you know how to cook them?
If not, you're missing out on a great tasting root vegetable that's full of vitamins and minerals - and the best part is that its relatively low carb, too!
You can cook them and serve them as mashed potatoes, chunk them up and throw them in a crock pot with a roast or cut them up and serve them my favorite way - as fries or chips!
When I received my Secret Recipe Club blog this month, Gastronomical Sovereignty, I was hoping to find a recipe that was low carb or one that I could change to make low carb. I was thrilled when I came across Kristy's recipe for rutabaga chips!
Rutabagas are relatively low carb (approx. 8 carbs per cup), especially when comparing them to the much missed potato. I discovered them on my first journey into low carbing. I get easily bored eating the same vegetables over and over again so I often grab something that's unfamiliar to me (after reading it on a low vegetable list, of course), buy it and then hit the Internet to find out how to prepare it. This was the case years ago. Since then, I've prepared them in all of the ways that I mentioned above - I love them! Often described as having a sweet taste, I think that they have more of a slight peppery taste too them - that's why I love them.
It's a super simple recipe that wields lots of taste!
Rutabaga Chips
For one serving:
1-2 small rutabagas, sliced paper thin
2 tbsp. olive oil
sprinkle of black pepper and all natural Mediterranean spices
Toss the chips with the olive oil, pepper and any other spices of your choice. Lay the chips in a single layer on a baking sheet.
Bake for 5-6 minutes @ 450*. Turn over and bake for another 4-5 minutes, keeping an eye on them to make sure you don't burn them.
Remove from the oven and allow to cool. Serve with low carb ketchup or low carb ranch dressing, if desired but I find them to be delicious on their own!
**Tip** Eat the chips as soon as they are cool enough to handle because they will go soggy - and while they are still tastey, they're more like fried potatoes than chips.
Kristy's blog has so many delicious recipe to pick from. Definitely take some time to flip through her blog. The pictures are mouthwatering, too!
Thanks for another great month here at the Secret Recipe Club!
***I have to take a minute to thank my son for helping me to type up this post. I pulled the muscles in my right hand and arm from a fall on Friday evening. He came to my rescue to help me today!**
Don't forget to spread some bloggy love by taking a few minutes to visit all of the blogs in our wonderful blog hops!!
Labels:
low carb,
side dishes,
snacks,
veggies
Monday, November 28, 2011
November SRC - Chicken with Rustic Balsamic Tomato Sauce
I can't believe that it's the end of November already! That means that it's time once again for our reveal party for Group D of the Secret Recipe Club.
I was paired with Kathleen's blog, Gonna Want Seconds. I knew from the first couple of minutes of thumbing through her recipes, that I was going to find many, many favorites to try. Her recipe for Chicken with Rustic Balsamic Tomato Sauce is a perfect match for my ways of cooking so I decided that would be my choice for the SRC.
Like Kathleen, I do not peel nor seed tomatoes unless it's absolutely necessary - and then it better be for a worthwhile cause. hahaha! This is a one pan dish so full of flavor. I made a couple of changes - I couldn't find decent plum tomatoes anywhere so I subbed two containers of grape tomatoes, which worked perfectly fine. I also left out the Rosemary because I thought that I had some in my freezer but I didn't and I didn't feel like running back to the store before dinner. I'm sure that the fresh Rosemary would add even more wonderful flavor to this dish. I left out the shallots because my family doesn't care for them. I love balsamic vinegar and the reduction in this recipe is fantastic when cooked with the tomatoes.
I served the chicken over rice but egg noodles would work nicely, too. If you want a lighter meal, serve the chicken with a side salad.
Chicken with Rustic Balsamic Tomato Sauce
4 tsp olive oil-divided
4-5 skinless boneless chicken breast - I used a 2.5 bag
2 tbsp fresh rosemary-chopped - I omitted
1/2 tsp salt
1/4 tsp black pepper
1/4 c. shallots-chopped - I omitted
3 tbps garlic-minced
1/4 c. balsamic vinegar
6 plum tomatoes-diced - I used 2 pints of grape tomatoes, halved
1/4 c.chicken broth
1/4 tsp sugar - I added it
1/4 c. fresh basil-chopped
Heat 2 tsp oil in a large pan. Sprinkle both sides of chicken with salt and pepper. Add to skillet and brown on both sides. Transfer the chicken to a platter.
Add 2 tsp oil to the pan. Lower the heat and add garlic. Cook about two minutes, stirring often.
Add the vinegar, stirring to scrape up the brown bits from the bottom of the pan. Cook until the vinegar is almost evaporated.
Stir in the tomatoes, chicken broth and sugar. Bring to a boil. Reduce heat and simmer for 15 minutes.
Add chicken back to pan, turn to cover with sauce. Continue cooking until the chicken is cooked through. Stir in basil.
Serve over rice or egg noodles. For a lighter meal, serve the chicken with a side salad.
Here's how you can join us in the Secret Recipe Club!
Labels:
chicken - turkey,
main course,
Secret Recipe Club,
veggies
Monday, November 7, 2011
Crockpot Italian Beef Roast with Potatoes & Carrots
One of my all-time favorite meals is a beef roast with veggies cooked in a crockpot. It's a perfect meal for these chilly days we've been experiencing. This past Saturday was a busy day for us with indoor soccer practice, shopping and taking my daughter to a birthday bowling party... so coming home to a cooked dinner was so nice!
I cooked 2 - 2 1/2 lb beef roasts so that I would have enough meat left over to make beef noodle soup this week. Give a big cheer for a great 2 for 1 meal!
If you think that meat won't brown in a crockpot, just check this out.... MMM! Tender and juicy!
The potatoes and carrots soak up all of the beef juices, rounding out the meal and making it delicious!
Crockpot Italian Beef Roast with Potatoes & Carrots
2 - 2 1/2 lb beef roasts, thawed if frozen
7 Idaho potatoes, peeled and diced into small cubes
5 large carrots, peeled and diced into small cubes
1 pkg. Grill Mates Italian Herb Seasonings & Marinade
1 tbsp. garlic powder
2 c. beef broth
This recipe completely filled my 6 qt. crockpot so I wouldn't recommend using a smaller unit unless you decrease the amounts of this recipe.
Into the crockpot, layer potatoes and top with carrots. Sprinkle half of the Italian herb seasoning pkg. onto the vegetables. Pour 1 c. of beef broth over all.
Lay the beef roasts side by side on top of the vegetables. Sprinkle with the remaining Italian herb seasonings and garlic powder. Pour remaining cup of beef broth over top of the meat and down the sides into the crock.
Cook on high for 5 - 5 1/2 hrs.
To Make Gravy
Remove the beef roast and the vegetables to a large platter. Cover with foil to keep warm.
Leave all of the broth and juices in the crockpot.
Stir 3 tbsp. cornstarch into 1/2 c. beef broth. Whisk this mixture into the broth that's left in the crockpot, stirring constantly until smooth. Cook for 5 minutes until the gravy starts to thicken.
Serve immediately with the roast and vegetables.
***Extra Meals***
Any leftover meat and potatoes can be made into beef noodle soup.
or
The potatoes and carrots can be whipped together for a great topping to shepard's pie or beef pot pie that's made from the left over beef and gravy.
Linking up to:
A Bowl Full of Lemons
Labels:
beef,
crockpot,
family favorite,
veggies
Monday, May 30, 2011
Bow Tie Pasta Salad
Happy Memorial Day!
**My family and I would like to say THANK YOU to our military men & woman, past and present, for serving and protecting us!**
We had this Bow Tie Pasta Salad at our little family picnic today. It was 95 and very humid here so we ate inside in the AC. ;) We had a simple picnic of hot dogs, pasta salad, cake w/strawberries and iced tea.
Bring on summer!
Bow Tie Pasta Salad
2 -12oz boxes of bow tie pasta, cooked
2 medium tomatoes, diced into small pieces
1 large cucumber, diced into small pieces
1 can of black olives, drained and diced into small rings or pieces
12 oz Kraft Greek Vinaigrette salad dressing
6 oz Kraft Italian salad dressing
1/3 c. Salad Supreme
Cook pasta. Drain and rinse with cold water. Drain again.
Stir in tomatoes, cucumber, and black olives.
Pour salad dressings and Salad Supreme over pasta. Stir to mix well.
Refrigerate for at least 4 hours. Serve cold.
**My family and I would like to say THANK YOU to our military men & woman, past and present, for serving and protecting us!**
We had this Bow Tie Pasta Salad at our little family picnic today. It was 95 and very humid here so we ate inside in the AC. ;) We had a simple picnic of hot dogs, pasta salad, cake w/strawberries and iced tea.
Bring on summer!
Bow Tie Pasta Salad
2 -12oz boxes of bow tie pasta, cooked
2 medium tomatoes, diced into small pieces
1 large cucumber, diced into small pieces
1 can of black olives, drained and diced into small rings or pieces
12 oz Kraft Greek Vinaigrette salad dressing
6 oz Kraft Italian salad dressing
1/3 c. Salad Supreme
Cook pasta. Drain and rinse with cold water. Drain again.
Stir in tomatoes, cucumber, and black olives.
Pour salad dressings and Salad Supreme over pasta. Stir to mix well.
Refrigerate for at least 4 hours. Serve cold.
Labels:
pasta,
salad,
side dishes,
veggies
Thursday, May 26, 2011
Tuscany Pasta
I haven't been inspired to try much of anything new lately but with all of the veggies and fruits coming into season right now, I don't want to miss out on them, either. My recipe for Tuscany Pasta came together rather quickly with some fresh ingredients that I had on hand. It's a light dish full packed full of flavor.
Tuscany Pasta
1 lb of shell pasta, cooked
2 cans of diced tomatoes with basil and oregano
3 tbsp Italian seasonings
olive oil for cooking vegetables
1 16 oz container of button mushrooms, sliced
3 tbsp minced garlic in olive oil
1 bag of fresh spinach
freshly grated Parmesan cheese, for topping (optional)
Cook pasta, drain and set aside.
While the pasta is cooking, pour the two cans of tomatoes into a large sauce pot. (big enough to hold cooked pasta). Stir in Italian seasoning and cook over medium heat for 20 minutes, stirring occasionally.
In a large frying pan, drizzle two tbsp. of olive oil. Add mushrooms to the pan, along with the garlic and saute until the mushrooms start to soften. Remove the mushrooms to a bowl and keep warm.
In the same frying pan, drizzle in one more tbsp. of olive oil. Add entire bag of spinach to the pan. Toss the spinach to coat it with the olive oil. Cook over medium heat until the spinach just starts to wilt. This will happen very quickly so do not stop tossing the spinach while it is cooking. Spoon the spinach into the bowl with the mushrooms.
Once the tomatoes have cooked for 20 minutes, add the mushrooms and spinach to the sauce. Stir to mix well. Continue simmering for 5-10 minutes.
Pour the cooked shells into the pot of tomato sauce. Toss well to evenly coat the pasta.
To serve, spoon into bowls and top with freshly grated Parmesan cheese.
Buon Appetito!
Labels:
family favorite,
main course,
pasta,
veggies
Sunday, May 15, 2011
Whole Wheat Pita Pizza with Cheese, Mushrooms & Fresh Herbs
Here's a more grown up version of our family's favorite pita pizzas. White pizza is one of my all time favorites. I like to change up the ingredients every time I make it for myself. This one gets lots of flavor from fresh oregano, rosemary, basil and thyme.
Whole Wheat Pita Pizza with Cheese, Mushrooms & Fresh Herbs
makes 2
2 whole wheat pita breads
2/3 cup shredded cheese. I used Sargento
Artisan Blends Mozzarella & Provolone &
Double Cheddar - 1/3 c. of each
1c. white button mushrooms, sliced
olive oil
fresh herbs such as basil, oregano, rosemary and thyme
1 tbsp. minced garlic
1/2 c. ricotta cheese
Lay the 2 pita breads on a baking sheet. Divide and sprinkle 1/3 c. shredded cheddar cheese over both pitas. Set aside.
Thoroughly wash the fresh herbs. Pat dry with paper towels. Finely chop herbs and set aside.
In a frying pan, add 2 tbsp olive oil. Add mushrooms. Saute mushrooms in oil until soft, stirring in herbs and garlic during the last 2 minutes of cooking.
Divide the mushrooms mixture between the two pitas, covering both to the outer edges.
Divide and sprinkle 1/3 c. shredded mozzarella and provolone cheeses on top of the pitas.
Using a teaspoon, drop the ricotta into 6 small circles on each pita. I used a butter knife to lightly draw lines in the cheese, dividing the pitas into 6 pieces. The end point of each piece got a dollop of ricotta cheese.
Bake at 450* for 8-10 minutes.
Labels:
fresh herbs,
pizza,
veggies
Monday, April 18, 2011
Garden Veggie Muffins
These corn muffins would be perfect to serve up for an afternoon brunch. They would match perfectly with a bowl of soup, chili or some sliced ham.
You will find that kids are more willing to eat their veggies if they help to prepare the food they are eating. This is a simple recipe that will get the kids into the kitchen and cooking!
Garden Veggie Muffins
1 box of Jiffy corn muffin mix
1 egg
3/4 c. milk
1/2 c. California blend frozen veggie, thawed
2 oz. cream cheese, room temperature
1 tbsp. sour cream & onion chip dip
Stir together corn muffin mix, egg and milk until blended. - some tiny lumps are ok.
Squeeze the water out of of the California veggie mix by dumping the veggies into a piece of cheesecloth or 2 coffee filters. Squeeze to drain off the water. Stir the veggies into the muffin mixture.
Line 6 silicone muffin tins onto a baking sheet. Spoon the muffin mix evenly into the six cups.
Bake at 350* for 15 minutes or until the muffins are lightly browned and a toothpick stuck in the middle of a muffin comes out clean. Be careful not to over bake.
For herb spread:
Stir together the cream cheese and sour cream & onion dip. Top each muffin.
Vegetable decorations:
Thinly slice 5 rounds from a small English cucumber. Thinly slice a small radish for the middle round. Level off the top of a muffin. Spread a thin layer of the herb spread onto the muffin, using the spread a the "glue" to hold the cucumbers. Add another dot of the herb spread to the middle of the muffin and top with a radish disk.
You could also use thinly sliced radish for the flower petals and fill the middle with raisins or sunflower seeds.
Store any leftovers in a sealed container in the refrigerator.
Linking up to:
Mouthwatering Monday
My Meatless Monday
Midnight Maniac Meatless Monday
Made By You Monday
Melt in Your Mouth Monday
Tasty Tuesdays
Labels:
appetizer,
bread - rolls...etc,
kids' recipes,
veggies
Friday, April 1, 2011
Johnny Marzetti
Have you heard of Johnny Marzetti before? It's a dish that we ate for school lunches back when I was in school.
Where did the name come from? According to the Pittsburgh Post Gazette website, Johnny Marzetti is a casserole created in the 1920s by the owner of the Marzetti Restaurant in Columbus, Ohio. Who was Johnny Marzetti? According to the "American Century Cookbook" by Jean Anderson, Johnny Marzetti was the brother of the owner of the Marzetti Restaurant.
Casseroles steamrolled into the kitchen in the 1940s and have remained popular staples to this day. The Johnny Marzetti casserole was popular in the mid '50s and early '60s. It consists of meat, pasta and either tomato sauce, soup or juice.
My husband and I were talking about school lunches and comparing them to what our kids eat in school now. I decided to look up a recipe for Johnny Marzetti to see if I could duplicate the school's recipe. Did I duplicate it? No, not exactly. But the dish that I created was delicious. Like chili, it tastes even better warmed up as leftovers. The recipe that I remember had more of a spaghetti sauce sort of taste with no onion and peppers showing in it. Some say the original recipe contains cheese but I don't ever remember cheese in what I ate. There's also a controversy over whether or not it was made with egg noodles or elbow macaroni. It was always elbows for us.
This was a nice trip down memory lane.
Johnny Marzetti
1 pound ground chuck
1 onion, diced
1 green pepper, diced
1 teaspoon oil
1 large can tomatoes (29 ounces)
1 large can tomato juice
1 pound elbow macaroni, cooked
Salt, to taste
Pepper, to taste
Garlic salt, to taste
Brown meat, onion and green pepper in oil.
Drain, then add tomatoes, tomato juice and spices.
Add cooked macaroni to sauce. Simmer 10 minutes and serve.
Store any leftovers in a sealed container. It's even better the next day!
Labels:
beef,
casseroles,
family favorite,
main course,
pasta,
veggies
Thursday, March 31, 2011
Turkey Meatball & Spinach Calzones
We love calzones but to find a really good one around here at a restaurant is a big challenge, not to mention the price! It's not as hard as you might think to make your own. I took a big short cut and used frozen bread dough. If you're more inclined to make your own dough, here's an easy bread machine dough recipe that's delicious.
Either way, just add your favorite pizza toppings and bake. It's that simple.
Tonight's calzones have turkey meatballs, spinach, mozzarella cheese and pizza sauce in them. MMM! The wonderful thing about this recipe is that it's so versatile. You can clean out the frig and stuff it into a calzone and your family will think that you are a 5-star chef! Get creative and get the kids into the kitchen. It will taste even better to them since they've helped to make it.
Turkey Meatball & Spinach Calzones
2 loaves frozen bread dough, thawed according to package directions. Let rise according to package directions
1 bag frozen turkey meatballs, thawed
1/2 bag frozen spinach, thawed
shredded mozzarella cheese
pizza sauce
Sprinkle flour onto a large cutting board or onto the table. Divide each loaf of bread in half. Working with one piece of bread at a time, roll it out flat.
Cut the turkey meatballs in half. Lay 12- 14 pieces onto the bottom half of the dough. Spoon 2-3 tbsp. of pizza sauce over the meatballs.
Divide the spinach into 4 equal amounts. Sprinkle 1/4 of the spinach over the meatballs and sauce. Top with a generous sprinkling of cheese.
Fold the top half of the dough down over the filling. Wrap the dough into a rope form around the edges of the calzone, making sure the edges are sealed tightly. Refer to picture for help.
Lay the calzone on a baking sheet. Bake at 350* for 45-55 minutes, depending on the size and ingredients. Bake until the calzones are a deep golden brown. Serve with a side of pizza sauce for dipping.
Linking up to:
Rock Your Recipes
Food on Fridays
Friday, March 25, 2011
Pork & Beans Chili
Tonight's meal was part 3 using the pork loin that I bought a while back. For $14.98 I was able to make 3 big delicious dinners - Lime-Glazed Pork Loin, Pork Soulvaki, and today's dinner Pork & Beans Chili.
Slowly but surely, I'm trying to get my family to try different types of beans. So far, they only types that any of the 3 of them will eat are green beans and black beans. I used one of my favorites, cannellini beans, in the chili tonight. The pork and beans blended with the tomatoes creating a yummy chili.
Pork & Beans Chili
1lb. boneless pork loin, cubed into small pieces
2 cans stewed tomatoes
1 can diced tomatoes
1 c. water
1 palm full of chili powder
1/2 palm full of cumin
2 big pinches of garlic powder
2 big pinches of onion powder
1 pinch of cayenne pepper
(I apologize for the measurements but I didn't
plan on blogging about this meal until it turned
out so delicious.)
1 lg. can of canellini beans, drained well
In a large frying pan, brown the pork. Remove to a plate and set aside.
Mix together the tomatoes and the water. Pour into a blender and puree until smooth.
Pour the pureed tomatoes back into the large frying pan. Stir in the seasonings. Add the pork.
Stir well. Cover and cook on medium-low for 20 minutes. Stir in beans and continue cooking for 10 minutes.
Serve with warm cornbread.
Linking to:
Frugal Follies Thursday
Labels:
main course,
pork,
soup,
veggies
Friday, March 11, 2011
Ham & Broccoli Strata
My husband and kids gave me The Taste of Home Cookbook * New Revised Edition for Mother's Day last year. I've spent many nights flipping through the pages reading it like a good book. But up until now, I haven't made any of the recipes. I finally flipped through the book and picked out several recipes that I will be trying over the next few weeks.
For the first new recipe, I made a Ham & Broccoli Strata. Although it turned out picture perfect, it wasn't a big hit with my husband and daughter. My son and I liked it but neither of us were in a hurry to add it to the menu again. I made only one substitution - switched the Swiss cheese for a combo of Monterrey Jack and Cheddar- but this could've been a big mistake. For my taste buds, something was missing. I bet that the "bite" of the Swiss cheese would've been much better. My son didn't care for the bread in it. I think that I would try this recipe again using Swiss cheese. I would also cut the bread into smaller chunks and make sure that the bread got mixed with the wet ingredients.
Here's the recipe with the only sub in bold.
Ham & Broccoli Strata
recipe from Taste of Home
6 cups frozen chopped broccoli, thawed and drained
3/4 pound thinly sliced deli ham, cut into 1/2-inch strips
2 cups (8 ounces) shredded Swiss cheese - I subbed a mix of Monterrey Jack and Cheddar Cheese
1 loaf (8 ounces) French bread, cut into 1-inch slices
6 eggs, lightly beaten
2 cups milk
3 tablespoons dried minced onion
3 tablespoons Dijon mustard
1/2 teaspoon hot pepper sauce
1/2 teaspoon paprika
In a large bowl, combine the broccoli, ham and cheese; spread half into a greased 13-in. x 9-in. baking dish. Arrange bread slices on top. Cover with remaining broccoli mixture. In a large bowl, combine the eggs, milk, onion, mustard and hot pepper sauce. Pour over broccoli mixture. Sprinkle with paprika. Cover and refrigerate overnight.
Remove from the refrigerator 30 minutes before baking. Bake, uncovered, at 350° for 35-40 minutes or until a knife inserted near the center comes out clean. Let stand for 5 minutes before serving.
Yield: 12 servings.
Labels:
breakfast,
casseroles,
eggs,
main course,
pork,
veggies
Sunday, March 6, 2011
Creamy Garlic Chicken Stew
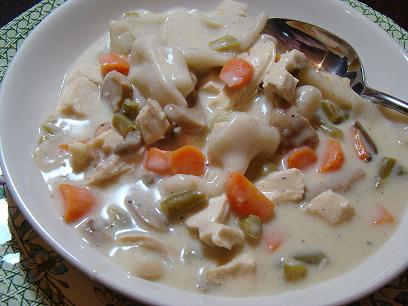
We're talkin' about comfort food tonight. We are sitting down to big bowls of chicken stew. Filled with veggies, chicken and flat dumplings, this stew tastes as good as it looks!
This is the second of four new Philly Cooking Cremes that I'm testing for my House Party reviews. Since my first recipe, Santa Fe Lasagna, turned out to be a big hit, I had high hopes for the Creamy Garlic Chicken Stew. I think that they have a hit on their hands with these cooking cremes. The Savory Garlic Cooking Creme is very good. It has a mild garlic flavor to it, not overpowering at all. The cooking creme helped to make the stew really creamy.
Creamy Garlic Chicken Stew
3 boneless chicken breasts, poached and cubed into bite-sized pieces
2 c. carrots, diced small
1/2 c. celery, diced small
2 small canned of sliced mushroom, drained well
2 tsp. poultry seasoning
1 tsp. black pepper
2 dried bay leaves
1 can of green beans, drained well and chopped into bite-sized pieces
2 c. (minus 2 tbsp) flour
64 oz. chicken broth or chicken stock
1 tub Philly Savory Garlic Cooking Creme
2 tbsp butter & 2 tbsp olive oil for frying pan
1/2 package of Anne's Old Fashioned Flat Dumplings
Poach chicken breasts; remove from water and cool. Chop chicken into bite-sized pieces.
In a large frying pan, heat butter and olive oil. Add carrots, celery and mushrooms. Sprinkle in poultry seasoning, black pepper and bay leaves. Cook over medium heat until the carrots are fork tender.
Add flour. Stir to completely cover the vegetables with the flour.
Carefully stir in the chicken broth, stirring until the broth is creamy with no lumps of flour showing. Stir in the tub of Philly Savory Garlic Cooking Creme. Continue stirring until the broth is creamy with no lumps in it.
Add chicken and green beans to the pan. Cover and cook 15 minutes over medium heat. The broth will start to thicken.
Remove half of the flat dumplings from the box. Put the remaining dumplings back into the freezer for a later use. Cut each dumpling strip in half. Drop four dumplings at a time into the stew, stirring well after every set of dumplings has been added. Put the lid back on the pot and continue cooking for 12 - 15 minutes. Stir frequently.
Serve with warm, crusty bread.
**Other serving suggestions**
Serve the stew (without dumplings) over cooked penne pasta or serve the stew (without dumplings) over warm biscuits.
My whole family enjoyed this. This recipe is definitely a keeper. As my husband says "Add it to the rotation!" :)
Labels:
chicken - turkey,
family favorite,
main course,
pasta,
sauces - condiments - dressings..etc,
veggies
Monday, February 28, 2011
Beef Barley Vegetable Soup
We've had some unusual spring weather here in NC lately. For the last two days, the temps have reached over 75*. That's about to change, though. With warm winds meeting the cold winds from up north, our whole area in under a tornado watch. Six years ago this would've freaked me out. Moving from PA, I never had to deal with tornadoes much at all. In fact, I can remember 2 tornadoes touching down in my lifetime while living there. From the first day of moving to this area of NC, we've had tornado watches and warnings all around us in the spring. The very first day that we moved in I asked a lady how often they have tornadoes. She said "Don't worry hun, we haven't had a tornado in our area in more than 8 yrs." HHHmmm... we must have brought that cold Yankee weather with us to mix with the warm southern winds because we've had at least one tornado touch down in our area each of the last six years!! There's been destruction but luckily no one has been injured or worse and we've faired just fine from it. Bottom line, buy a good weather radio and get on with life.
Bet you didn't think that you were going to get a weather report from me today, did you? Keep reading.... there really is a recipe today.
Cool, rainy weather puts me in the mood for soup. Beef Barley Vegetable soup is on the menu today. Take a look. MMMM!!
Beef Barley Vegetable Soup
1 1/2 lbs. beef stew meat
1/2 c. flour for coating meat and vegs
2 stalks of celery, chopped into bite-sized pieces
2 large carrots, chopped into bite-sized pieces
8 oz. mushroom, chopped into bite-sized pieces
12 oz of canned or frozen corn, drained if canned
12 oz of canned or frozen green beans, drained if canned
1 can stewed tomatoes, chopped
3/4 of a large can of tomato juice
64 oz beef broth
2 tsp. dried thyme
2 tsp garlic powder
2 tsp black pepper
2 bay leaves
1 1/2 c. quick cooking barley
In a large soup pot, brown meat in 3 tbsp. oil. While meat is browning, add celery and carrots. Finish browning meat and then stir in flour. Stir to coat the meat and veggies.Cook for 5 minutes
Pour in tomato juice, beef broth, stewed tomatoes and seasonings. Cook for 15 minutes.
Add corn, green beans and mushrooms. Stir well. Cover with a lid and cook on low for 2 - 2 1/2 hrs or until the meat and carrots are tender. Stir in 1 1/2 c. of quick cooking barley. Continue cooking barley using the instructions on the back of the box. (about 15 minutes).
Serve with warm, crusty bread. Freeze any leftovers.
Labels:
beef,
main course,
soup,
veggies
Wednesday, February 23, 2011
Spicy Chicken & Broccoli Stir Fry
I have always been able to get my kids to eat different kinds of vegetables by cooking stir fries. They love trying new flavor combinations, too. I was rummaging around our local thrift store last week but not having any luck finding anything worthwhile. My daughter ran up to me to show me that she had found three Betty Crocker cookbooks... a dessert book, a casserole book and a stir fry book. Not one to turn away many cookbooks, into the cart they went!
Tonight's dinner, Spicy Chicken & Broccoli Stir Fry, was from the stir fries cookbook. Betty didn't disappoint me. The dinner was delicious. I did a quick search to see if I could find the recipe on the Better Crocker website. It's there and with only one change with the new version from the older version in the cookbook - the older version called for deboning chicken breasts and the new version calls for an easier way by using chicken tenderloins. I used boneless chicken breasts. I made a few substitutions to the recipe which I've highlighted in bold.
Spicy Chicken & Broccoli Stir Fry
adapted from BettyCrocker.com
I doubled this recipe.
1 package (15 ounces) chicken breast tenders (not breaded) - I used 5 boneless chicken breasts
2 teaspoons cornstarch
1/2 teaspoon salt
1/4 teaspoon white pepper
1 pound broccoli - I used 4 small bunches of fresh broccoli florets
3 tablespoons chili or vegetable oil
1 hot fresh green chili, cut into very thin slices - I used red pepper flakes & added them to the adult's plates only
2 tablespoons brown bean sauce - I subbed Hoisin Sauce
2 teaspoons finely chopped garlic
1 teaspoon sugar
1 teaspoon finely chopped ginger root
3 green onions, cut diagonally into 1-inch pieces
Mix chicken, cornstarch, salt and white pepper in medium bowl. Cover and refrigerate 20 minutes.
Peel outer layer from broccoli. Cut broccoli lengthwise into 1-inch stems; remove flowerets. Cut stems diagonally into 1/4-inch slices. Place broccoli flowerets and stems in boiling water; heat to boiling. Cover and cook 1 minute; drain. Immediately rinse with cold water; drain.
Heat wok or 12-inch skillet over high heat. Add oil; rotate wok to coat side. Add chili, brown bean sauce, garlic, sugar and ginger root; stir-fry 10 seconds. Add chicken; stir-fry about 2 minutes or until chicken is no longer pink in center. Add broccoli and onions; stir-fry about 1 minute or until broccoli is heated through.
I served the dish with jasmine rice.
**Notes: While the dish was delicious as is, we tend to like more sauce with our stir fries. I will make the sauce portion of this recipe x4 the next time**
Labels:
chicken - turkey,
main course,
stir fry,
veggies
Thursday, February 17, 2011
Mini Cucumber Sandwich Appetizers
We love these little cucumber sandwiches. If you don't have the luxury of having freshly picked cucumbers from a garden, use English seedless cucumbers. They sub just fine.
I didn't get a really good picture of the sandwiches because my family was eating them as fast as I was making them.
Mini Cucumber Sandwich Appetizers
1-2 English cucumbers, peeled and sliced into thin rounds
4 oz. cream cheese, softened
4 oz. mayo
1-2 tsp. milk
1 pkg Hidden Valley Ranch Seasoning Mix
1 loaf of cocktail rye bread
Peel and slice cucumbers into thin rounds. Lay rounds on paper towels to remove any water. Set aside.
Mix together cream cheese, mayo and ranch seasoning mix. Stir in milk, 1 tsp at a time, until the mixture reaches a spreadable consistency.
Spread a think layer of the ranch mixture onto the rye breads. Top each bread slice with one or two cucumber slices, depending on the size of your cucumbers. I had to use two rounds on each bread because the cucumbers were thin.
Layer sandwiches into a container that has a tight fitting lid. Add waxed paper between layers of sandwiches. Refrigerate for at least two hours or up to overnight .
Refrigerate any leftovers.
I didn't get a really good picture of the sandwiches because my family was eating them as fast as I was making them.
Mini Cucumber Sandwich Appetizers
1-2 English cucumbers, peeled and sliced into thin rounds
4 oz. cream cheese, softened
4 oz. mayo
1-2 tsp. milk
1 pkg Hidden Valley Ranch Seasoning Mix
1 loaf of cocktail rye bread
Peel and slice cucumbers into thin rounds. Lay rounds on paper towels to remove any water. Set aside.
Mix together cream cheese, mayo and ranch seasoning mix. Stir in milk, 1 tsp at a time, until the mixture reaches a spreadable consistency.
Spread a think layer of the ranch mixture onto the rye breads. Top each bread slice with one or two cucumber slices, depending on the size of your cucumbers. I had to use two rounds on each bread because the cucumbers were thin.
Layer sandwiches into a container that has a tight fitting lid. Add waxed paper between layers of sandwiches. Refrigerate for at least two hours or up to overnight .
Refrigerate any leftovers.
Labels:
appetizer,
bread - rolls...etc,
family favorite,
veggies
One Pan Pork Fried Rice
I came up with this fried rice recipe to go along with the homemade egg rolls that I made a while back. It's easy to make and very versatile...you can use chicken, pork, beef or even make it without meat. It's great for using bits and pieces of leftovers from the week that's stuck in the frig. The secret ingredient is the sesame oil that really gives it a unique flavor.
One Pan Pork Fried Rice
4 c. quick cooking rice
3 1/2 c. water for cooking rice
2 c. boneless pork, cubed into 1" pieces
4 eggs
1 bag frozen stir fry vegetables
1 1/2 c. soy sauce
1/2 c chicken broth
sesame oil
Cook rice and set aside. I use quick cooking rice - Cook 4 c. rice in 3 1/2 c of water to make it less sticky.
Using one large frying pan:
Scramble 4 eggs. Remove to a plate and keep warm.
Saute frozen stir fry vegetables in 2 tbsp of canola or vegetable oil. Cook until vegetables are fork tender. Remove to the plate that holds the scrambled eggs.
Cook the pork in 2 tbsp canola or vegetable oil + 1 tsp sesame oil. Cook just until the pork is no longer pink. Be careful not to over cook. Add the cooked pork to the eggs and vegetables.
Add cooked rice to the large frying pan. Stir in one cup of soy sauce + 2 tsp. sesame oil. Heat over medium low heat for 1 -2 minutes, stirring constantly.
Stir in vegetables and pork. Mix well. Pour in 1/2 c. chicken broth + 1/2 soy sauce. Heat through.
Chop eggs into small pieces. Stir into rice.
Serve hot.
Labels:
eggs,
family favorite,
main course,
pork,
side dishes,
veggies
Thursday, February 3, 2011
Tomato Chilie Chicken over Egg Noodles
I'm cookin' from the pantry tonight. I had chicken thighs in the frig that had to be cooked, along with some green peppers and mushrooms. I knew that I had some canned tomatoes....sounds like a plan to me.
We've been fighting the flu here for the last week. Things are finally looking up. We're just left with some coughing. Seems like everyone is fighting one strain of flu or another right now. Food is finally starting to taste normal again. :)
This meal came together rather quickly and everyone enjoyed it....well, almost everyone ate without complaining. My daughter won't allow a tomato to pass her lips without complaining about it. She ate some of it anyway.
Tomato Chilie Chicken over Egg Noodles
6 chicken thighs, cooked, skin removed and deboned
2 - 14.5 oz - diced tomatoes with mild green chilies
1 - 28 oz - crushed tomatoes
1/2 c. water
2 green peppers, sliced into thin strips
1 -8oz - package sliced mushrooms
2 tbsp. chili powder
2 tbsp cumin
12 oz. cooked egg noodles, kept warm for serving
Cook chicken. Remove skin and pull the chicken from the bones. Set aside.
Into a large frying pan, add the green peppers, mushrooms, tomatoes with chilies, crushed tomatoes and water. Stir in chili powder and cumin. Cook for 15 minutes over medium-high heat.
Stir the chicken into the tomato mixture. Continue cooking for 30 -45 minutes over low heat, cooking for 30 minutes if you like the peppers tender crisp or longer if you like them softer like we do.
Serve chicken and tomatoes over egg noodles.
Labels:
chicken - turkey,
main course,
pasta,
veggies
Subscribe to:
Posts (Atom)