Showing posts with label family favorite. Show all posts
Friday, November 25, 2011
Pumpkin Cheesecake
Looking to switch things up a bit for the holidays instead of the usual pumpkin pie? Try Paula Deen's recipe for pumpkin cheesecake.
This is one beautiful, creamy cheesecake! It's easy to make, too. I followed her directions, only adding more spices to it.
Pumpkin Cheesecake
From Paula's Home Cooking/Celebrates cookbook
Crust:
1 3/4 cups graham cracker crumbs
3 tablespoons light brown sugar
1/2 teaspoon ground cinnamon
1 stick melted salted butter
Filling:
3 (8-ounce) packages cream cheese, at room temperature
1 (15-ounce) can pureed pumpkin
3 eggs plus 1 egg yolk
1/4 cup sour cream
1 1/2 cups sugar
1/2 teaspoon ground cinnamon - I used 1 tbsp
1/8 teaspoon fresh ground nutmeg - I used 1 tsp
1/8 teaspoon ground cloves - I used 1 tsp
2 tablespoon all-purpose flour
1 teaspoon vanilla extract
Preheat oven to 350 degrees F.
For crust:
In medium bowl, combine crumbs, sugar and cinnamon. Add melted butter. Press down flat into a 9-inch springform pan. Set aside.
For filling:
Beat cream cheese until smooth. Add pumpkin puree, eggs, egg yolk, sour cream, sugar and the spices. Add flour and vanilla. Beat together until well combined.
Pour into crust. Spread out evenly and place oven for 1 hour. Remove from the oven and let sit for 15 minutes. Cover with plastic wrap and refrigerate for 4 hours. I made our cheesecake the night before and refrigerated it. Set it on the counter for 15 minutes before cutting it for easier handling.
Labels:
desserts,
family favorite,
gift of food,
holidays
Monday, November 7, 2011
Crockpot Italian Beef Roast with Potatoes & Carrots
One of my all-time favorite meals is a beef roast with veggies cooked in a crockpot. It's a perfect meal for these chilly days we've been experiencing. This past Saturday was a busy day for us with indoor soccer practice, shopping and taking my daughter to a birthday bowling party... so coming home to a cooked dinner was so nice!
I cooked 2 - 2 1/2 lb beef roasts so that I would have enough meat left over to make beef noodle soup this week. Give a big cheer for a great 2 for 1 meal!
If you think that meat won't brown in a crockpot, just check this out.... MMM! Tender and juicy!
The potatoes and carrots soak up all of the beef juices, rounding out the meal and making it delicious!
Crockpot Italian Beef Roast with Potatoes & Carrots
2 - 2 1/2 lb beef roasts, thawed if frozen
7 Idaho potatoes, peeled and diced into small cubes
5 large carrots, peeled and diced into small cubes
1 pkg. Grill Mates Italian Herb Seasonings & Marinade
1 tbsp. garlic powder
2 c. beef broth
This recipe completely filled my 6 qt. crockpot so I wouldn't recommend using a smaller unit unless you decrease the amounts of this recipe.
Into the crockpot, layer potatoes and top with carrots. Sprinkle half of the Italian herb seasoning pkg. onto the vegetables. Pour 1 c. of beef broth over all.
Lay the beef roasts side by side on top of the vegetables. Sprinkle with the remaining Italian herb seasonings and garlic powder. Pour remaining cup of beef broth over top of the meat and down the sides into the crock.
Cook on high for 5 - 5 1/2 hrs.
To Make Gravy
Remove the beef roast and the vegetables to a large platter. Cover with foil to keep warm.
Leave all of the broth and juices in the crockpot.
Stir 3 tbsp. cornstarch into 1/2 c. beef broth. Whisk this mixture into the broth that's left in the crockpot, stirring constantly until smooth. Cook for 5 minutes until the gravy starts to thicken.
Serve immediately with the roast and vegetables.
***Extra Meals***
Any leftover meat and potatoes can be made into beef noodle soup.
or
The potatoes and carrots can be whipped together for a great topping to shepard's pie or beef pot pie that's made from the left over beef and gravy.
Linking up to:
A Bowl Full of Lemons
Labels:
beef,
crockpot,
family favorite,
veggies
Pumpkin Gingerbread Muffins
I love gingerbread and I love pumpkin muffins. Combine the two and you have a wonderfully moist, delicious treat. Great for breakfast, packing into lunch bags or for dessert topped with a little whipped cream, applesauce or ice cream!
This recipe was posted at FamilyCorner.com by a friend of mine who goes by "cat lover" on the forums. She turned her recipe into a cake. I made muffins from the batter. The only thing that I changed was to add a little more spices to the batter. Either way, it's great!
Pumpkin Gingerbread Muffins
1 - 16 oz can pumpkin
4 eggs
3 1/2 cups flour
2 cups sugar
1 cup butter, softened
1/2 cup light molasses
1/3 cup water
2 tsp baking soda
1 tsp salt
2 tsp cinnamon
1 tsp ginger
1/2 tsp baking powder
1 tsp nutmeg
1/2 tsp ground cloves
Combine all ingredients in a large bowl. Beat at low speed for 30 seconds, stopping to scrape the bowl often. Beat at medium speed 3 minutes, again stopping to scrape the bowl.
Line muffin tins with paper liners. Spoon into paper liners and fill to the top of the cup - I used a large ice cream scoop to fill the cups. Do not level off evenly. The muffins will round out when they are baking.
Bake at 350 degrees for 20 minutes or until a toothpick stuck into the middle of a muffin comes out clean - check often so that you do not overbake.
For an extra sweet treat, top with whipped cream, warm apple sauce or ice cream.
Makes 30 muffins.
Linking up to:
Jane Deere Fusion Fridays
A Bowl Full of Lemons
Labels:
breakfast,
desserts,
family favorite,
fruits,
gift of food,
holidays,
lunchbox,
snacks
Friday, October 7, 2011
Itty Bitty Cinnamon Rolls
My kids are not breakfast eaters first thing in the morning but I've found that if I make bite-sized versions of some breakfast treats, they will eat them. As a result, these itty bitty cinnamon rolls were born.
I took a short cut and used frozen bread dough so it really didn't take long at all to be able to serve hot, fresh cinnamon rolls instead of another cold breakfast. I'll be honest and tell you that I made these rolls on a weekend morning --I did not get up before the birds on a school day to roll out bread dough. I know that there are plenty of you out there who do get up in the wee morning hours to prepare breakfasts every morning and I commend you for doing so but that's not me. I'm NOT a morning person, no matter how hard I try to be. Had I been making these for a school morning, I would've prepared the rolls ahead of time the night before, stopping right before cutting them into pieces, and then I would've wrapped the long roll up tightly in plastic wrap and stuck it in the refrigerator. Then all that would have to been done the next morning would be to cut and bake the little rolls. Even the glaze could be made ahead of time but it really doesn't take much effort to whip it up while the rolls are baking.
The rolls are best if eaten hot, right out of the oven. I had just a few left over from the batch that I made and even after storing them in a tightly sealed container, they turned sort of rubbery and hard.
So there you have it...a simple yet very satisfying breakfast treat for days when you think that you don't have time to eat anything.
Itty Bitty Cinnamon Rolls
1 loaf frozen bread dough, thawed
1/2 c. brown sugar
3 tbsp. cinnamon
1/4 c. butter, room temperature
The directions are pretty simple:
Thaw frozen bread.
Preheat oven to 350*. Lightly coat a mini muffin pan with non stick cooking spray and set aside.
Roll out bread dough until flat and as close to a rectangle as possible - doesn't have to be perfect.
Mix the brown sugar and cinnamon together and then sprinkle all of it over the buttered dough.
Starting on the long end, roll up the log, tucking in the short end edges as you go along.
To cut:
Slice the long log in half. Slice each half in half, giving you four mini logs. You should be able to cut 6-8 mini rolls from each of the 4 mini logs.
Lay each cinnamon roll into a mini muffin hole in the pan.
Bake for approx. 15 minutes or until the rolls are golden brown.
Remove the hot rolls to a cooling rack. Drizzle with glaze (recipe below), if desired. Aren't they just the cutest little things?!?
Glaze for Itty Bitty Cinnamon Rolls
1 c. powdered sugar
2 tbsp. milk
1/4 tsp. vanilla
Stir all ingredients together until smooth. Generously drizzle the glaze over the warm cinnamon rolls.
Labels:
bread - rolls...etc,
breakfast,
desserts,
family favorite,
gift of food
Monday, October 3, 2011
Cookie Carnival - Raspberry Filled Lemon Cream Cheese Bars
For my second Cookie Carnival submission this month, I choose another cake mix cookie recipe but this time, instead of a round cookie, I made bar cookies - Raspberry Filled Lemon Cream Cheese Bars. The original recipe is from Betty Crocker. Their recipe calls for strawberry preserves but since I already had raspberry preserves in the frig, I opted to use it instead. I loved the pairing of the slightly sweet raspberry preserves with the slightly sour lemon margarita filling.
Raspberry Filled Lemon Cream Cheese Bars
adapted from Betty Crocker.com
Bar Cookie Base:
1 box lemon cake mix
1/2 c. butter, softened
1/2 c.p finely chopped almonds
1 c. low sugar raspberry preserves
Filling:
8 oz. cream cheese, softened
1/4 c. sugar
1/4 c. flour
1/8 tsp. salt
1 egg
1/4 c.bottled margarita mix
1/4 c. lemon juice
Heat oven to 350°F. Grease 13x9-inch pan and set aside.
Place cake mix in large bowl. With pastry blender or fork, cut in butter until crumbly. Add almonds; mix well. Reserve 1 cup mixture for topping. Press remaining mixture in bottom of pan.
Stir preserves until smooth; carefully spread over base.
In same bowl, beat cream cheese, sugar, flour, salt and egg with electric mixer at medium speed until well blended. Add margarita mix and lemon juice; beat at low speed until blended. Carefully pour filling over base.
Sprinkle reserved base mixture over filling.
Bake 35 - 40 minutes or until edges begin to brown and center is set.
Cool completely, about 1 hour. Cut into bars. Store covered in refrigerator.
My first Cookie Carnival cake mix cookie submission this month was: Chunky Chocolate Peanut Butter Cake Mix Cookies!
Want to join in on the Cookie Carnival fun? It's easy! Click here to find out more info.
Labels:
Cookie Carnival,
desserts,
family favorite,
gift of food
Cookie Carnival - Chunky Chocolate Peanut Butter Cake Mix Cookies
One of the recipes for September's Cookie Carnival was cake mix cookies - any recipe of your choice as long as it was a new recipe that you were trying. We were allowed to submit 3 cookies recipes of this type.
My family loves cake mix cookies so I knew that this would be any easy choice for me. What I didn't realize until I started searching for new ideas was there there are hundreds of recipes out there for cake mix cookies and not just your ordinary round cookie either...there's bars, biscotti, squares, balls...so many to choose from.
The great thing about cake mix cookies is that you can clean out the leftover bits of this and that from your cupboards by dumping the stuff into your cookie recipe. Sounds like some sort of mad scientist experiment, huh?
I had several boxes of chocolate cake mix in my cupboard so it was a no brainer that my recipe was going to be a chocolate cookie. In the back of the cupboard, I found a bag with about a cup of chocolate chunks and on the same shelf, there was an almost empty jar of peanut butter. Who doesn't like chocolate and peanut butter mixed together?
I started with a basic cake mix cookie recipe...one with water, oil, and eggs but then I made a few adjustments to the recipe. The results were delicious! You could taste just a slight hint of peanut butter through all of the chocolate. My husband is not a peanut butter cookie fan so this was just enough for him. The gooey chocolate chunks were awesome and added to the fun of eating these cookies while they were still warm.
Chunky Chocolate Peanut Butter Cake Mix Cookies
1 (18.25 oz) devils food cake mix
1/3 c. water
1 egg
1/2 c. creamy peanut butter
1 c. semi sweet chocolate chunks
Preheat oven to 350*
Using a large bowl and a wooden spoon, mix together cake mix, water, egg and peanut butter until all ingredients are combined. Stir in chocolate chunks. (I used my hands to mix the chips into the cookie dough.)
Roll the dough into walnut-sized balls. Place the cookies on a lightly greased cookie sheet in 4 rows of 3 cookies, leaving plenty of room for the cookies to spread out. Using a fork, flatten the cookies in a criss-cross pattern.
Bake for 10 -12 minutes. The cookies will still be slightly soft in the middle. Watch carefully and do not overbake.
Cool the cookies on the pan for 1-2 minutes before removing from the cookie sheet.
These cookies will freeze well, too.
Want to bake with us in the Cookie Carnival? Here's what you need to know!
Labels:
chocolate,
Cookie Carnival,
desserts,
family favorite,
gift of food,
kids' recipes,
lunchbox
Sunday, August 14, 2011
Roasted Greek Chicken & Potatoes
This dish is wonderful enough to serve double duty as an easy weeknight dinner or as a special holiday dinner.
The chicken stays juicy, while the potatoes roast up crispy on the outside and soft on the inside.
Roasted Greek Chicken & Potatoes
I didn't measure any specific amounts for this recipe.
It can be made in small or large amounts, depending
on the number of people you are feeding.
thawed chicken pieces - I baked 8 leg & thigh pieces
red potatoes, cubed small - I used 8 medium potatoes
olive oil
lemon juice
Greek seasoning
minced garlic
oregano
lemon pepper seasoning (no salt added)
Use a roasting pan big enough to hold both the chicken and the potatoes.
Rinse and pat dry the chicken pieces. Lay the chicken flat in one side of the pan, skin side up.
Cube potatoes (I left the skins on) and lay opposite of the chicken in the other side of the roasting pan.
Drizzle the olive oil over the chicken and potatoes and then sprinkle both with lemon juice.
Sprinkle approx. 2 tbsp. greek seasoning and lemon pepper on top of the chicken and potatoes.
Sprinkle approx. 1 tbsp. oregano and minced garlic over top of both.
Stir the potatoes, making sure they're coated with the oil, lemon and herbs.
Preheat oven to 450*
Bake chicken and potatoes for 20 minutes.
Lower oven to 375*
Continue baking for 1 - 1 1/2 hrs longer, checking after 1 hour to see if the juice in the chicken are clear.
Once chicken is done roasting, remove it to a plate and keep warm.
Spread the potatoes out in a single layer in the pan. Stick the pan under the broiler for 3 -5 minutes or until the potatoes have browned a little bit.
Serve immediately.
Leftover chicken is delicious as chicken salad or on a sandwich. Leftover potatoes are great fried the next day.
Saturday, August 13, 2011
Poor Man's Cookies
This cookie recipe has been handed down generation to generation in my family. I can remember my grandmother baking these cookies for all of our family reunions, for Christmas dinner, for Easter dinner and any other time that she was asked to bring a dessert to an event.
With just a handful of basic pantry ingredients, I imagine that the recipes comes from the Depression Era. Baking them takes me back to my younger years and the memories make me smile.
Poor Man's Cookies
1 c. golden raisins
1 1/2 c. water
1 stick of butter
2 c. flour
1 c. sugar
1/4 tsp. salt
1 tsp baking soda
1 egg
3/4 c. walnuts, finely crushed - I used
glazed pecans because that's what I had
on hand
Add raisins and water to a medium-sized pot. Bring to a boil and cook for 5 minutes. Add the stick of butter and stir until the butter is melted. Set aside to cool.
Mix together flour, sugar, salt. Stir in crushed nuts.
In a separate bowl, lightly whip the egg and vanilla, using a fork. Stir the egg mixture into the dry ingredients. Mix well.
Add the raisins and all of the liquid in the pot. Stir until completely mixed together. Set aside and allow the batter to rest for 5 minutes.
Spray a small baking sheet with non-stick cooking spray. Pour the cookie batter into the baking sheet. Spread the batter out evenly.
Bake for 20 - 25 minutes or until golden brown. Start checking the cookies after 18 minutes. Mine were done in exactly 20 minutes.
Cool the cookies in the pan. Glaze while still warm to the touch.
Glaze Recipe
2 c. powdered sugar
3 tbsp. milk
1 tsp. vanilla
4 tbsp. butter, very soft or melted
Beat all ingredients together until smooth.
Linking up to:
Gooseberry Patch Round 'Em Up & Take 'Em To Go!
Labels:
desserts,
family favorite,
family recipes
Tuesday, July 19, 2011
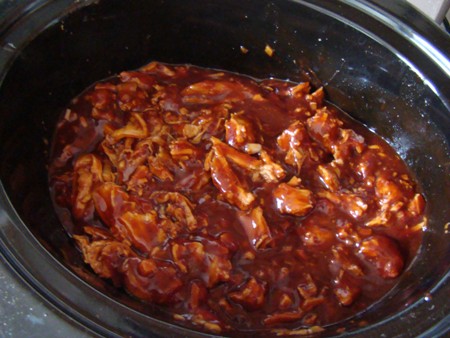
Jack Daniel's BBQ Pulled Pork
The idea to create my own bbq pulled pork came from a trip to Sam's Club on our shopping trip for July 4th. Sam's was full of sample givers that day. My kids couldn't wait to get in there to sample all of the foods - funny how they will try foods during this time that they wouldn't normally try at all!
One stand was handing out bites of prepacked Jack Daniel's bbq pulled pork. My kids and even my normally really picky husband all liked it. (maybe the samples work on husbands, too?). I thought that I was good but I couldn't get over the fact that the meat was minced beyond recognition. I cannot stand to eat bbq like this. I like to be able to recognize the meat that I am eating. My husband challenged me to find a recipe that would compare to the taste of the bbq on the minced meat sandwich bites that they were scarfing down.
I searched through many cookbooks at home and at the library, through magazines and on the Internet. I finally found a recipe called "Jack Daniels BBQ Sauce" on the Budget 101 forum by someone with the username BiggerPiggyBank. The recipe calls for simple ingredients cooked together to create a homemade bbq sauce. I think that double cooking it - once on the stove as called for in the recipe and then again in the crockpot on make the pulled pork, really deepens the flavors. I truly believe that this is one of the best bbq sauces that I have ever tasted. **Note** This sauce is on the sweeter side. If you like a vinegar based sauce, I wouldn't suggest this one.
Jack Daniels BBQ Pulled Pork
4-5 lb pork tenderloin, cut in half
1 c. chicken broth
1 recipe for Jack Daniels BBQ Sauce (below)
onion buns
You will need a large crockpot for this recipe. I used a 6 qt. oval crockpot.
Add the pork tenderloin to the crockpot.
Pour 1 c. of chicken broth into the crockpot.
Cover and cook for 3 - 4 hrs. on high. After 3 hrs,., check to see if the pork is done by using two forks to"pull" it apart. It should fall apart easily. If not, continue cooking until the pork has been cooked though. My tenderloin cooked for about 3 1/2 hours.
Remove the pork to a cutting board and shred the entire loin using two forks. My preference is to leave the pork in big pieces. You can also chop it into smaller bits if you prefer.
Drain the broth from the crockpot. Return the pulled pork to the crockpot. Cover with the Jack Daniels bbq sauce and stir to mix well. Cook on low for 2 hrs to blend the flavors. Keep warm until ready to serve.
Serve the bbq pulled pork on onion buns.
Jack Daniels BBQ Sauce
from user BiggerPiggyBank@Budget101 forums
my version in bold text
1/2 lg onion, chopped
4 cloves garlic, chopped - I used 4 tsp minced garlic
2 c ketchup
1/3 c vinegar
1/4 c worcestershire sauce
1/2 c brown sugar, packed
3/4 c molasses
1/2 tsp pepper
1/2 tbsp salt
1/4 c tomato paste
2 tsp liquid smoke - I used mesquite flavor
1/2 ts tabasco sauce, to taste - I used 2 tbsp
Burbon or whiskey -- to taste - I used 2 tbsp Jack Daniels Whiskey
(In my own words) Combine onion, garlic and whiskey frying pan. Saute onions and garlic.
Combine remaining ingredients, bring to boil, and then simmer for 20 minutes, stirring occasionally.
This recipe makes 4 cups. I doubled this recipe and used all of it to cover the pulled pork.
Before serving, spoon approximately half of pulled pork into another container to use for another meal. It is delicious when used in this recipe for Brunswick Stew. Can be frozen in a tightly sealed container.
Labels:
crockpot,
family favorite,
main course,
pork,
sandwiches,
sauces - condiments - dressings..etc
Monday, July 18, 2011
Secret Recipe Club: Orange Berry Cake
I can't believe that another month has flown by so quickly. It's time for another round up for the Secret Recipe Club. I'm baking from Alessio's blog, Recipe Taster. His blog features beautiful pictures and recipes. Many of his recipes stem from his Sicilian background. Delizioso!
When I saw his recipe for Orange Cake, I knew right away that I wanted to try it because I love the fresh taste of oranges in cakes and pastries. I will admit that some worry and nervousness set in when it came time to convert the recipe from grams to the American equivalents. I don't own a kitchen scale so I knew that I was going to have to rely on any Internet findings to get me through this time. You can imagine my surprise when I realized that there were no exact conversions for this measurements in this recipe. I decided to wing it anyway and I must say, I'm so happy that I did. This was a truly delicious cake. It was very light and moist, showered with a wonderful orange flavoring. The orange zest hits it out of the park. Do not even be tempted to leave it out.
Alessio shows several different ways to decorate the cake on his blog but I choose to use a low sugar real berry jam as a glaze for the top of the cake, along with a sprinkling of orange zest on top.
So simple and pretty! It pairs perfectly with a cup of herbal tea. The recipe will definitely go into my "favorites" pile.
Orange Berry Cake
adapted from the blog: Recipe Taster
7 tbsp. butter, softened
1/2 c. granulated sugar
zest of 3 lg. oranges
1 lg. egg yolk
2 lg. eggs
1 3/4 tbsp. canola oil
1/2 c. 100% real orange juice
1 c. all purpose flour
1 3/4 tsp baking powder
4 heaping tbsp. low sugar real berry jam
zest of 1 orange for decoration
Preheat oven to 350*. Grease and flour a 9 inch or 10 inch spring form pan and set aside.
I would recommend using a stand mixer for this recipe, although it could be mixed with a hand mixer.
In the bowl of your stand mixer, add the butter and beat until light and fluffy. Gradually add the sugar to the butter and beat until no longer grainy and the mixture is light and fluffy.
Mix in the orange zest from 3 oranges.
Add egg yolk to the mixture and beat until combined. Add eggs, one at a time, and beat until everything is mixed together and looks smooth and creamy.
With the beaters still running, stream in the canola oil. Mix well.
Alternate pouring the flour and the orange juice into the wet mixture in the bowl. Mix well after each addition.
Spoon the batter into the spring form pan. Tap the pan on the counter top to release the air bubbles in the batter.
Bake for 20 - 25 minutes. My cake was perfectly baked at 22 minutes.
Allow the cake to cool in the pan for 10 minutes before inverting it onto a cake platter.
Melt 4 heaping tbsp. low sugar real berry jam in the microwave or on the stove top. Using a pastry brush, gently brush the melted jam over the top of the cake.
Sprinkle the zest of 1 orange over top of the jam.
My husband and kids, as well as I, really enjoyed this cake so I can't tell you what to do with any leftovers. I would imagine that the cake tastes the best if eaten the same day it was baked.
Time to gear up for next month's Secret Recipe Club event! Click here from more info. on how you can join in on the fun!
You just can't help but to drool over all of these beauties below. We love comments! Let us know what you think!!
Labels:
desserts,
family favorite,
fruits
Monday, July 4, 2011
Chocolate Coconut Bars
If you love the combination of coconut and chocolate, you must try Family Circle's latest recipe for Chocolate Coconut Bars. You can find it in the July issue of Family Circle or you can access the recipes on the website by signing up for their free newsletter.
The bars are sort of a cake/brownie combination. Of course, when it comes to spices and extracts, I often add more than what's called for in a recipe because I like a denser flavor. I did this with the icing recipe for these bars. The recipe calls for 1/4 tsp. of coconut extract. This left the icing with barely a hint of coconut flavor. I added 2 more tsp. of coconut extract, plus 1/4 of powdered sugar to soak up the added liquid. This amount was perfect. It's a nice coconut flavor but not overwhelming and paired nicely with the chocolate bars.
I would imagine that you could freeze the bars with no problem - they won't last long enough in our house. I have to add an * here, though. Instead of using a 9 x 13 pan as called for in the recipe, I used a smaller 8 x 10 pan, making the bars a littler thicker. I cut the bars into 15 pieces.
Chocolate Coconut Bars
adapted from Family Circle Magazine - July 2011
Ingredients
1 cup (2 sticks) butter
4 squares (1 ounce each) unsweetened chocolate, broken up
1 1/2 c. sugar
1 1/2 c. flour
4 eggs
1/2 tsp baking soda
1/4 tsp salt
1/2 tsp coconut extract
1 c. sweetened flake coconut
1/2 c (1 stick) unsalted butter, softened
2 c. confectioners' sugar
2 1/4 tsp coconut extract
Heat oven to 350*.
Line a 8 x 10 baking pan with foil. (9 x 13 can be used). Spray the pan with nonstick cooking spray.
Make Bars:
Combine butter and chocolate in a microwave-safe bowl and microwave for 1 minute. Stir. Microwave another minute and stir. Microwave for 30 seconds more and stir until smooth.
Stir in sugar, flour, eggs, baking soda, salt and coconut extract. Pour into prepared pan; smooth top.
Bake for 30 minutes. Watch carefully and check often so that you do not over bake the bars.
Remove pan and sit on a cooking rack.
Prepare Topping:
Spread coconut on a baking sheet and bake at 350* for 10 minutes or until golden.
In a large bowl, combine butter and powdered sugar. Beat until smooth. Beat in coconut extract and 2 tbsp water. Stir in up to 1/4 c. extra powdered sugar to make a thick icing.
Spread over partially cooled bar and top with toasted coconut. Cover with plastic wrap or a tight fitting lid. Refrigerate until completely cooled.
Set the bars on the counter 15 - 30 minutes before serving . Cut into small squares.
Refrigerate any leftovers.
The pièce de résistance, however, was scooping up a bite of the coconut bars along with a bite of creamy, homemade chocolate ice cream. Heavenly! (chocolate ice cream recipe coming soon!)
Labels:
chocolate,
desserts,
family favorite
Saturday, July 2, 2011
Cookie Carnival - Chewy Peanut Butter Cookies
I grew up eating only one kind of peanut butter cookie - my mother's homemade recipe. She would make them for Christmas and Easter and any other family get-togethers we might have during the year. I remember helping her bake and scooping out the peanut butter - always JIF! I remember how she would take the time to criss cross each cookie with a fork so that the lines were just perfect - and I imagine that she still does the same thing. Mom, if you're reading this, your cookies have definitely left good memories!! Those cookies were sort of crisp on the outside, yet sort of soft on the inside. A perfect cookie for dunking in milk or coffee. I don't make those cookies here at my house because my dh and kids really don't like plain peanut butter cookies. But I can instantly snap back and remember what they tasted like when she tells me that she just baked a batch of them.
When I found this recipe called Chewy Peanut Butter Cookies and saw that it called for coconut and oats and that it was a soft, chewy cookie, I thought that I might be able to pass this off to my family. I thought that it would be the perfect cookie to try out in the Cookie Carnival. Since it was June, I knew that many kids, including mine, would be out of school so I was hoping that it might pique their interest into getting into the kitchen!
Well, it worked. My kids helped with baking these cookies and all of us ended up really liking them. I love Smucker's Natural Peanut Butter but I didn't have any on hand so I subbed regular creamy peanut butter. I think that using the regular peanut butter instead of natural added more oil to the mix, thus making them spread more. My cookies turned out to be really thin (and not too pretty) but they tasted great!
Chewy Peanut Butter Cookies
adapted from Smucker's website
1 cup sugar
1 cup firmly packed light brown sugar
1/2 cup butter, softened
3/4 cup smooth, creamy peanut butter
2 large eggs
2 tablespoons milk
1 teaspoon vanilla extract
1 cup flour
1 teaspoon baking powder
1 teaspoon baking soda
1 1/2 cups quick rolled oats
1 cup flaked coconut
Preheat oven to 350*.
Beat sugar, brown sugar, butter and peanut butter until creamy. Beat in eggs, milk and vanilla. Mix well. Combine flour, baking powder and baking soda; stir in rolled oats and coconut. Add to peanut butter mixture and beat on low speed until well blended. Cover and chill 30 minutes.
I used a large ice cream scooper to drop mounds of the cookies onto ungreased cookie sheets. Bake 15 - 17 minutes or until light brown around edges. Cool 2 minutes before removing to wire rack to cool completely. If the cookies start to stick to the pan, return the pan to the oven for a minute to soften the cookies again. Remove from the pan immediately using a large, flat spatula.
Join the Cookie Carnival and bake along with me each month!
Labels:
Cookie Carnival,
desserts,
family favorite,
kids' recipes
Monday, June 13, 2011
Secret Recipe Club: Easy Oreo Truffles
I have had such a sweet tooth lately. I decided ahead of time, before receiving my secret blog name, that I would search for something sweet to make for this round of the Secret Recipe Club.
I was totally thrilled to receive A Tale of One Foodie's Culinary Adventures as my secret name. Erin's blog is full of sweet treats with beautiful pictures accompanying her recipes. In fact, her pictures of the Easy Oreo Truffles is what drew me in to my recipe of choice to begin with!
With just 3 ingredients, you can't go wrong making these. It does take a little time if you want them to turn out as beautiful as Erin's did. Mine didn't look quite as nice but they are still pretty. One thing is for sure...these little gems are rich and chocolaty and absolutely delicious. I have 4 more recipes from Erin's blog bookmarked for me to add to my menus this summer!
Easy Oreo Truffles
original recipe from Kraft
my version adapted from A Tale of One Foodie's Culinary Adventures
1 regular-sized pkg of Oreos
8 oz. cream cheese, softened
16 oz. semi-sweet chocolate, melted
toppings: sprinkles, nuts or crushed Oreos
Add entire package of Oreos to a large food processor. Chop until the Oreos turn into coarse crumbs. Reserve 1/3 cup of crumbs for the topping on the truffles.
Add cream cheese to the cookie crumbs. Process until the crumbs and cream cheese are blended together.
Roll the mixture into 1 inch balls and place on a baking sheet lined with waxed paper. Once the baking sheet if full, stick it into the freezer for 5-8 minutes (or you could stick the tray into the frig for a while longer). This step makes dipping the truffles so much easier. I tried dipping them without freezing them and the balls fell apart in the chocolate.
Melt the chocolate in a double boiler on the stove or by melting it in the microwave. Dip each truffle one by one, laying each one back onto the wax paper lined tray. Immediately sprinkle the candies or crushed Oreos on top of the truffles.
Refrigerate the truffles on the tray for at least 1 hour. Store in a tightly sealed container. For maximum flavor, refrigerate for at least 4 hours before serving.
MMM! A prefect choice for those sweet tooth cravings.
I've enjoyed another month in the Secret Recipe Club. If you would like to join us, here's what you need to know.
Labels:
desserts,
family favorite,
Secret Recipe Club
Thursday, May 26, 2011
Tuscany Pasta
I haven't been inspired to try much of anything new lately but with all of the veggies and fruits coming into season right now, I don't want to miss out on them, either. My recipe for Tuscany Pasta came together rather quickly with some fresh ingredients that I had on hand. It's a light dish full packed full of flavor.
Tuscany Pasta
1 lb of shell pasta, cooked
2 cans of diced tomatoes with basil and oregano
3 tbsp Italian seasonings
olive oil for cooking vegetables
1 16 oz container of button mushrooms, sliced
3 tbsp minced garlic in olive oil
1 bag of fresh spinach
freshly grated Parmesan cheese, for topping (optional)
Cook pasta, drain and set aside.
While the pasta is cooking, pour the two cans of tomatoes into a large sauce pot. (big enough to hold cooked pasta). Stir in Italian seasoning and cook over medium heat for 20 minutes, stirring occasionally.
In a large frying pan, drizzle two tbsp. of olive oil. Add mushrooms to the pan, along with the garlic and saute until the mushrooms start to soften. Remove the mushrooms to a bowl and keep warm.
In the same frying pan, drizzle in one more tbsp. of olive oil. Add entire bag of spinach to the pan. Toss the spinach to coat it with the olive oil. Cook over medium heat until the spinach just starts to wilt. This will happen very quickly so do not stop tossing the spinach while it is cooking. Spoon the spinach into the bowl with the mushrooms.
Once the tomatoes have cooked for 20 minutes, add the mushrooms and spinach to the sauce. Stir to mix well. Continue simmering for 5-10 minutes.
Pour the cooked shells into the pot of tomato sauce. Toss well to evenly coat the pasta.
To serve, spoon into bowls and top with freshly grated Parmesan cheese.
Buon Appetito!
Labels:
family favorite,
main course,
pasta,
veggies
Tuesday, May 17, 2011
Sweet & Sour Pineapple Shrimp and Rice Bowls
I've been searching the Internet for recipe ideas that would be outside our normal everyday meals. I found a recipe on Kraft.com for Pineapple Shrimp Kabobs. Instead of making this a kabob meal, I made it a "stir fry" of sorts. It turned out to be a quick 30 minute meal with tons of flavor.
I made some changes to the recipe and in the end I was very pleased at how it turned out. My happiest moments came as my kids took their first bites and both surprisingly said "I really like this!" You had to be here while I was preparing the meal. My daughter kept insisting that she hated shrimp and that she wasn't going to eat dinner ...and, of course, she said that I was going to starve her on purpose. She ended up eating more shrimp than anyone else. My son admitted that he thought that he would hate but that he really liked it.
What more could I ask for? :)
Sweet & Sour Pineapple Shrimp and Rice Bowls
adapted from Kraft.com
4 cups of cooked rice of your choice, kept warm
3/4 c. zesty Italian dressing
2 tbsp + 2 tsp brown sugar
1 tbsp minced garlic
3 - 4 tbsp sweet chili sauce
1/4 c. unsweetened pineapple juice
2 bags large size frozen shrimp, tails removed and thawed
3/4 can of unsweetened pineapple chunks
1/3 c. fresh basil, chopped
Prepare rice and keep it warm until ready to eat.
In a medium-sized frying pan, stir together Italian dressing, brown sugar, garlic, chili sauce and pineapple juice. Cook over medium heat for 5 minutes, until the sauce is bubbling and starts to thicken just a bit.
Stir in shrimp. Cook for 5- 6 minutes.
Add pineapple and basil. Continue cooking for 2 more minutes.
To Serve:
Scoop rice into individual bowls.
Spoon the pineapple shrimp sauce over the rice.
~*~*~*~*~*~
Linking to:
Tempt My Tummy
Tuesdays at the Table
Tasty Tuesdays
Labels:
family favorite,
fish - seafood,
fruits,
stir fry
Sunday, April 17, 2011
The Secret Recipe Club - Pumpkin Pie Snickerdoodle Bars
I'm participating in a new blogging challenge called The Secret Recipe Club. My friend, Amanda, from Amanda's Cookin' is the host. The object of this challenge is that each blogger is assigned the name of one of the other participating blogs. You then pick any recipe from that blog and make it. You don't reveal whose blog that you have until the round up on the chosen date. Click here to find out how you can join in on the fun!
My secret blog for this month was Megan's Cookin'. Megan has a beautiful blog with so many delicious recipes posted on it. I chose bake her Pumpkin Pie Snickerdoodle Bars. I actually made these at the beginning of the month for my husband's birthday. I knew that they would go over big because love sweet pumpkin desserts. When you bite into the bars, it really is like eating a slice of pumpkin pie only in bar form. Very moist and delicious with lots of pumpkin flavor.
The only changes that I made were to add more pumpkin pie spice to the filling and more spices to the topping. I omitted the white chocolate drizzle topping. I topped the bars with whipped cream.
Pumpkin Pie Snickerdoodle Bars
adapted from Megan's Cookin'
Snickerdoodle Layer
3 c. all-purpose flour
2 tsp. baking powder
1 tsp. salt
2 c. packed brown sugar
1 c. butter, at room temperature
2 eggs, at room temperature
1 tbls. vanilla
Pumpkin Pie Layer
1 c. all-purpose flour
1 c. white sugar
1/2 c. butter, at room temperature
1 tsp. baking powder
1 tsp. salt
1 tbsp. pumpkin pie spice
2 eggs, at room temperature
1 1/2 c. canned pumpkin
Topping
4 tbsp. white sugar
2 tsp.cinnamon
1/2 tsp. nutmeg
1 tsp. pumpkin pie spice
Assembly:
Preheat oven to 350F.
Lightly grease a 9×13 inch pan and lay a piece of parchment paper across the pan, so that it extends the pan slightly. Don't skip using the parchment paper. It makes removing the bars from the pan so very easy.
To make snickerdoodle layer:
Sift together flour, baking powder and salt. Set aside.
In a large bowl, beat together butter, sugar, egg and vanilla until smooth.
Stir in the flour mixture until well blended. Spread evenly in prepared pan (mixture will be thick and cookiebatter-ish.)
To make pumpkin pie filling:
In a mixer bowl (you can use the same one you used to make the snickerdoodle batter) with a paddle attachment, mix together butter and sugar.
Add the rest of the ingredients and mix until well combined. This layer will be less thick and more pourable. Pour over the snickerdoodle layer, smoothing out the top.
To make the topping:
Combine white sugar and cinnamon in a little bowl. Evenly sprinkle cinnamon sugar mixture over the top of the batter.
Baking:
Bake for 33-40 minutes (maybe more depending on your oven) or until a toothpick inserted into the center of the pan comes out clean.
Let the bars cool completely (about an hour). They will deflate a bit and remain a bit pie-like on the top layer. The bars that are closer to the edges of the pan will be more firm.
Use the parchment paper to lift the bars out of the pan. Place on a cutting board and cut into bars.
Serve with a dollop of whipped cream.
Store in a covered container.
Labels:
desserts,
family favorite,
Secret Recipe Club
Subscribe to:
Posts (Atom)