Wishing everyone a happy, healthy, and prosperous new year!!
Please be careful if you are out on the roads tonight!
I'd love to hear how you spent your new year's eve and what you were doing when the new year rolled in!
We are sitting here waiting for the ball to drop. I can't wait to sleep in tomorrow! ;)
See ya in 2009!
Tami
Wednesday, December 31, 2008
Tuesday, December 30, 2008
Our Christmas Cookies
My kids and I had a good time making Christmas cookies this year. Both of the kids were a big help--even though if it were left up to my daughter, she would eat them in dough form and skip the baking!

Santa cleaned his plate, too, and drank all of his milk!
Santa cleaned his plate, too, and drank all of his milk!
Thanks to my Mom and my new mixer, the cookies were a breeze to mix up this year. Here they are from left to right:


The recipes:

Across Top: My soft sour cream sugar cookies
Bottom Left: chocolate chocolate chip cookies
Next to choc. choc. chip: "cleaning out the kitchen cookies"
Right side below sugar cookies- TWD sugar Cookies covered in cinnamon sugar
Right side bottom - My mil's soft oatmeal raisin cookies
The recipes:
Tami's Soft Sour Cream Sugar Cookies
1/2c. shortening(part butter or margarine)
1c. sugar
1 egg
1 tsp. vanilla
2 2/3c. flour
1 tsp. baking powder
1/2 tsp. baking soda
1/2 tsp. salt
1/4 tsp. nutmeg
1/2 sour cream
Heat oven to 425 degrees
Mix shortening, sugar, egg, & vanilla thoroughly.
Blend dry ingredients.
Add to sugar mixture alternately with sour cream.
Divide dough, roll out on a well-floured board. Cut with cookie cutters (metal cookie cutters w/ open tops are the easiest). You can make these as thick as you want...the thicker, the chewier.
Place cookies on greased baking sheets. Sprinkle with sugar unless you are going to ice them. Bake 7-8 min or until very lightly browned.
The Chocolate Chocolate Chip cookies can be found here. I've written about them already and they've become a favorite at our house.
"Cleaning out the kitchen cookies" come about when I have bits and pieces of things left over from other recipes. For example, in this recipe I used chocolate chips, peanut butter chips and crushed pecans. I've used coconut, almonds, mint choc. chips...whatever I have leftover that I think will tasted good when stir together. For the dough, I used a recipe from Five Forks
She posts about the ultimate chocolate chip cookie--and I think that she's absolutely right! This recipe is delicious!! Instead of using all of the chocolate chips that the recipe calls for, I divided up my ingredients into equal amts. I used my small cookie scoop instead of rolling the cookie dough into balls. These cookies are so good because they don't go flat when you bake them and they stay chewy! She has posted beautiful pics of the cookies on her blog.
The TWD Sugar Cookies can been found here. I had leftover dough so I rolled them into logs and stuck them in the freezer. I layed them on the table for about 5 minutes before I sliced them into circles, and then I dipped them into a cinnamon/sugar mixture and baked them. To me, they tasted better this way but I'm still not really crazy about this recipe. The dough was too much of a hassle for me to worry about. I'm totally biased toward sugar cookie recipes because I LOVE my recipe above.
Aud's Soft Oatmeal Raisin Cookies - if you like "dunking" cookies, you have to try these!
Here is the recipe:
½ c. sour milk ( ½ c milk with 1 & ½ tsp vinegar)
2 c. shortening
2 c. sugar
4 eggs
2 tsp. vanilla
½ tsp. salt
2 tsp. baking soda
2 c. raisins
4 c. flour
5 c rolled oats
Cover raisins with boiling water and let sit to soften ; drain well.
Blend shortening and sugar ; add eggs, one at a time; add vanilla & salt, mix thoroughly. Add raisins to dry mix. Dissolve soda in milk. Add flour alternately with milk. Add rolled oats
Bake at 375 degrees 12-15 minutes or until light brown
Thursday, December 25, 2008
Tuesday, December 23, 2008
Thanks Mom!
Look what my Mom gave to me when we were in PA to visit her!

She's this itty bitty little lady - not even 100 lbs soaking wet- and it took all she could do to move it around. She said that she knows how much I love to cook and bake so she asked me if I wanted it!! UH...YES!!!
You see...sadly (lol!) I am not an itty bitty little thing so I have no problem moving it around and I have been giving it a work out! It's gonna get a workout later today when I start on my Christmas cookies and other goodies, too!
Mom is a happy baker once again, too. She wanted a Sunbeam MixMaster so we bought her one so that she could bake her Christmas cookies! :) She told me tonight that she is thrilled with her new mixer.
LET'S BAKE!!
Merry Christmas Everyone!
Monday, December 22, 2008
Pumpkin Eggnog Bundt Cake
I made this pretty bundt cake a couple of weeks ago but I never got around to posting it until now. The cake is super easy to make - it would make a wonderful gift for Christmas.

You need:
1 box yellow cake mix
1 -4 serving- pkg. vanilla instant pudding & pie filling
1/4 C. pumpkin eggnog
1/4 C. vegetable oil
4 eggs
4 tsps. pumpkin pie spice
powdered sugar to sprinkle on top -optional
What you do:
Preheat oven to 350*
In a large bowl, mix together cake mix, pudding, eggnog and oil on low speed until moistened. Add eggs and pumpkin pie spice and beat on medium-high for 4 minutes.
Pour batter into a greased and floured bundt pan.
Bake 35 - 40 minutes or until a toothpick inserted into the middle comes out clean.
Cool in pan for 10 minutes. Remove cake from pan to a cooling rack to cool completely. Sprinkle with powdered sugar, if desired.
Sunday, December 21, 2008
Snowball Cookies
It wouldn't be Christmas at many homes without these nutty snowball cookies. This is an easy recipe that the kids can have fun helping to make snowballs. No snowball fights, though!

To see my recipe for these wonderful cookies, simply click on their name.

To see my recipe for these wonderful cookies, simply click on their name.
Mini Dreidel Cakes
Serve these yummy cake bites to "top" off your Hanukkah dinner. These adorable mini dreidels are fun for kids to help make so get started today!

What You Need:
1 frozen pound cake, cut into 6 thick slices
White Chocolate candy melts
White Chocolate candy kisses
Blue paste food coloring
Yellow sugar sprinkles (if desired)
Blue & White striped straws, cut into 2 in. pieces
What You Do:
For ease of cutting, make sure the pound cake is frozen. Using a serrated knife, trim the "crust" (outside brown layer) from the pound cake slices.
Cut each slice of cake into 4 rectangles - slice vertically in half and then horizontally in half. Holding a rectangle - long sides pointing up and down - stick one piece of a straw into the top of the cake, creating a handle.
Melt candy melts in the microwave according to directions. Reserve 1/2 cup of chocolate.
Holding onto the straw handle, dip each piece of cake into the white chocolate, turning to cover. Lie on plate and immediately stick a candy kiss onto the open end of the cake. Sprinkle Dreidels with yellow sugar, if desired. Once all of the cake pieces have been covered with chocolate and sugar, chill in refrigerator for 15 minutes.
Tint the reserved 1/2 cup of chocolate light blue. Fill a small plastic Baggie with the blue chocolate, creating a decorating bag. Barely snip one corner of the Baggie. Use this to draw the outlined boxes and letters on the Dreidels. (Refer to picture for help)
Store in a sealed container in the refrigerator. Bring to room temperature 30 minutes before serving.
Can be frozen after decorated.
Peanut Butter & Jelly Mitten Cookies
Are you looking for an easy wintertime project or perhaps something to do with your kids on a snowy day? These mitten cookies are the perfect project for you! The best part is that the kids get to eat their creations. YUM!
Asst. Colors of Paste Food Coloring
Small Candies for Decorating
Colored Sugars and Sprinkles
Mitten Cookie Cutter
Peanut Butter
Favorite Jelly or Jam
Sm. Plastic Baggies
Scissors
Dixie Cups or Small Bowls
What You Do:
Preheat oven to 350 degrees F.
Prepare your favorite Peanut Butter cookie dough recipe or use the one listed below. On a lightly floured surface, roll cookies dough out to 3/8 in. thickness. Make sure to cut out an even numbered amount of cookies so that they can be paired together. When laying cookies on a baking sheet, be sure to flip over every other cookie so that one mitten thumb is facing left and one is facing right, to make pairing easy. Bake as directed. It is important to make sure that these cookies are completely cooled before icing.
Time to Decorate:
Preparation:
An adult should prepare the icing ahead of time for easier handling. To color the Vanilla icing, add a small amount of icing into a bowl -one bowl per each color that you will be using- and stir in a small amount of paste food coloring. Make icing bags by filling a plastic baggie with one of the colored icings and squeezing the icing into one corner of the bag. Carefully snip off the very end of the corner of each bag.
Separate candies into individual bowls or Dixie cups.
Decorating Cookies:
Pair the cookies so that each child has two cookies, forming one mitten. Allow the kids to decorate the top cookie with icing, candy, etc. Set this cookie aside to dry. On the topside of the bottom cookie, spread a thin layer of peanut butter, topping with a thin layer of jelly. Finish by placing their decorated cookie on top of the jelly.
Serve alongside a glass of milk and enjoy!
For best quality and taste, these cookies are meant to be decorated and eaten immediately; not frozen for later use.
Peanut Butter Shortbread Cookies
1 C. Butter or Butter-Flavored Crisco
2/3 C. Creamy Peanut Butter
2/3 C. Light Brown Sugar, packed
1 1/2 tsp. Vanilla
2 1/2 C. All-Purpose Flour
1/4 C. Cornstarch
Combine the butter, peanut butter, and brown sugar in a large mixing bowl; beat with electric mixer until smooth and creamy. Beat in vanilla. Slowly beat or stir in the flour and cornstarch until mixture starts sticking together. At this point, I use my hands to mix the cookie dough until thoroughly mixed together. Roll out on a lightly floured board to about 3/8-inch thickness, cut with cookie cutters and place on an un-greased baking sheet.
Bake for 15-20 minutes, or until cookies are set and light brown. Cool on the pan for 5-7 minutes then remove to a wire rack to cool completely.

What You Need:
Peanut Butter Cookie Dough (use your favorite recipe or one is provided below)
Vanilla and Chocolate IcingAsst. Colors of Paste Food Coloring
Small Candies for Decorating
Colored Sugars and Sprinkles
Mitten Cookie Cutter
Peanut Butter
Favorite Jelly or Jam
Sm. Plastic Baggies
Scissors
Dixie Cups or Small Bowls
What You Do:
Preheat oven to 350 degrees F.
Prepare your favorite Peanut Butter cookie dough recipe or use the one listed below. On a lightly floured surface, roll cookies dough out to 3/8 in. thickness. Make sure to cut out an even numbered amount of cookies so that they can be paired together. When laying cookies on a baking sheet, be sure to flip over every other cookie so that one mitten thumb is facing left and one is facing right, to make pairing easy. Bake as directed. It is important to make sure that these cookies are completely cooled before icing.
Time to Decorate:
Preparation:
An adult should prepare the icing ahead of time for easier handling. To color the Vanilla icing, add a small amount of icing into a bowl -one bowl per each color that you will be using- and stir in a small amount of paste food coloring. Make icing bags by filling a plastic baggie with one of the colored icings and squeezing the icing into one corner of the bag. Carefully snip off the very end of the corner of each bag.
Separate candies into individual bowls or Dixie cups.
Decorating Cookies:
Pair the cookies so that each child has two cookies, forming one mitten. Allow the kids to decorate the top cookie with icing, candy, etc. Set this cookie aside to dry. On the topside of the bottom cookie, spread a thin layer of peanut butter, topping with a thin layer of jelly. Finish by placing their decorated cookie on top of the jelly.
Serve alongside a glass of milk and enjoy!
For best quality and taste, these cookies are meant to be decorated and eaten immediately; not frozen for later use.
Peanut Butter Shortbread Cookies
1 C. Butter or Butter-Flavored Crisco
2/3 C. Creamy Peanut Butter
2/3 C. Light Brown Sugar, packed
1 1/2 tsp. Vanilla
2 1/2 C. All-Purpose Flour
1/4 C. Cornstarch
Combine the butter, peanut butter, and brown sugar in a large mixing bowl; beat with electric mixer until smooth and creamy. Beat in vanilla. Slowly beat or stir in the flour and cornstarch until mixture starts sticking together. At this point, I use my hands to mix the cookie dough until thoroughly mixed together. Roll out on a lightly floured board to about 3/8-inch thickness, cut with cookie cutters and place on an un-greased baking sheet.
Bake for 15-20 minutes, or until cookies are set and light brown. Cool on the pan for 5-7 minutes then remove to a wire rack to cool completely.
Letter Meme
I requested a letter from Sharon at View from my treehousefor this meme. She assigned me the letter letter is "A" for Advent. I am supposed to list 10 things I LOVE that begin with the letter assigned.
A for Advent
1 & 2 are, without a doubt, Andy & Alexis (my kids!)
3. Anise -- I LOVE the flavor of this stuff!!
4. airplanes (thankfully my husband still has a job working on them!)
5. autumn
6.apple blossoms
7. My slight Pittsburgh-area accent :)
8.MacIntosh Apple Yankee Candles
9."All I Want for Christmas is My Two Front Teeth" - one of my favorite Christmas songs since my son sang it in his kindergarten Christmas concert.
10. participating in activities with my kids
Thanks, Sharon! This was fun!
If you would like to participate in this meme, just post a reply here and ask for a letter. I'd love to see what you come up with!
Wednesday, December 10, 2008
Pretzel Wreaths
 Add a touch of whimsy to your tree with these adorable and tasty pretzel wreaths. These also make the perfect last minute 'thank you' gift for friends, family or just about anyone. We made these as an early teacher's present during December's celebrations.
What You Need
Mini Pretzels - 7 pretzels per wreath
White Chocolate Candy Melts
Mini Candies such as Mini M&Ms, Red Hots, Gum Drops, etc.
Fruit Leather Rolls
Sugar (optional)
Wax Paper
Baking Sheet
What You Do
Line a baking sheet with wax paper. Using 7 pretzels for each wreath, form small circles on the wax paper.
Melt white chocolate in the microwave at 30-second intervals, until melted. Use the chocolate to "glue" the pretzels together, sides touching. While the chocolate is still wet, garnish with candy decorations. Either let the chocolate air dry or slide the baking sheet into the refrigerator for 5-10 minutes until the chocolate is hard.
We do not recommend refrigerating any of the wreaths that are decorated with candies that have a sugar coating. The sugary coating melts once the candies come back to room temperature.
Roll out the fruit leather, pressing both the front & back of the leather into sugar for a festive look. Cut into thin strips to use for ribbons on the wreath and for the hanger on top of the wreath.
 Tip: If you are planning on hanging your wreaths on a tree, use clear fishing line to create a hanger for your wreaths. Do not hang the wreath from the fruit leather, as it will break.
Reindeer Cookies

I made these reindeer cookies for the first time for my son's first grade Christmas party. Boy, where does the time go? He's now in 5th grade! We've made them as part of our Christmas cookies at home ever since then. They make me smile because they look so happy. :)
This is an easy recipe to get the kids into the kitchen with you!
What You Need
1 roll of pre-made sugar cookie dough
small pretzel rings
M & Ms
1 bell shaped cookie cutter
flour
baking sheet
What You Do
Preheat oven to 350 degrees F.
Open cookie dough and mix in about 1/4 cup of flour to make the dough a stiffer consistency. Lightly flour the table, then roll the dough out to 1/4 inch thickness.
Using the bell cookie cutter, cut out 12 bell cookies - this will vary depending on how thick you roll out the cookies. Lay the cookies, all the same way with bell facing you, onto the cookie sheet. Now, turn the cookie sheet around so that the bells are upside down. This is your reindeer face! Place a red M&M in his nose and one pretzel on each side of his head for the ears. (See photo)
Bake for 10 minutes or until very lightly browned around edges. Remove from oven and let cool on the baking sheet for 1-2 minutes. Remove to a cooling rack to finish cooling.
These make great Christmas party favors!
Tuesday, December 9, 2008
TWD ~ Grandma's All-Occasion Sugar Cookies
I am finally catching up on everything from being away on vacation for a week. YAY!
For this week's Tuesdays With Dorie recipe we are making Grandma's All-Occasion Sugar Cookies. This recipe was chosen by Ulrike of Kuchenlatein.
The dough was very quick and easy to whip up. However, this is where the "quick and easy" part stops. My dough was very soft, almost too soft. I resisted the urge to add more flour to it even though I thought that it would help tremendously.
I divided the dough into 2 pieces and chilled it for 3 hours. The dough was still very sticky when I took it out of the frig. At this point I did add a little more flour on the top and bottom of the dough to ease in moving the cut-out cookies from the table to the cookie sheet. After one round of cutting and chilling the dough, I decided that it would be much less frustrating to roll the remaining dough into a log and stick in the the freezer for one of those nights when my family wants dessert but I don't have anything made for that night.
I baked one sheet of cut-out candy canes, stocking and small circles. If you take the cookies out of the oven before they start browning, they will stay softer than if you leave them in until they start browning around the edges--of course, this is a personal preference that ranks right up there with "which ketchup is better" or "do you drink Coke or Pepsi?". We prefer the softer, chewier cookies.
I would suggest adding some other flavoring other than vanilla to the dough unless you are looking for a very plain sugar cookie. Since I hadn't added any extra flavoring, I decided to sandwich raspberry preserves inbetween the round cookies and then drizzle them with powdered sugar icing. They turned out pretty and tasted pretty good, too.
 I sprinkled chopped up Andes Candies onto a few of the stockings and candy cane cookies and stuck them back into the oven for a couple of minutes to melt the chocolate. For the remaining cookies, I just drizzled them with the left over powdered sugar icing.
 I'm sure that my family will enjoy the slice and bake cookies sometime soon! For some reason, cookie dough never seems to last long around here. ;)
Friday, December 5, 2008
Lump of Coal Candy
Do you know someone who has been naughty this year? Fill their stocking with these lumps of candy coal! This also makes a great gag gift!

What You Need
2 cups granulated sugar
3/4 cup light corn syrup
1/2 tsp. black paste food color
1/2 cup water
1 tsp. anise extract
What You Do
Line an 8-inch square baking pan with foil, extending edges over the sides of pan. Lightly grease foil with butter or baking spray.
Combine sugar, corn syrup and water in a heavy, non-stick, 2-quart saucepan. Stir over medium-low heat until sugar is dissolved and mixture comes to a boil. Cook about 15 minutes, without stirring, until a candy thermometer registers 290 degrees F.
Immediately remove from heat. Stir in anise extract and food coloring. Pour mixture into prepared pan. Cool completely.
Lift candy out of pan using foil. Place candy between 2 layers of heavy-duty foil. Using a hammer or mallet, break candy into pieces the size of a lump of coal.
Fill a plastic baggie with a few pieces of coal and attach the following poem:
POEM:
I heard you have been naughty not nice,
And Santa even checked his list twice.
So all the way from the cold North Pole
all you're getting is a bag of coal.
This is one of my favorite Christmas recipes that I have made. It does make a little bit of a mess when you go to break up the candy but it's so cute when it's packaged up that it's worth it.
Thursday, December 4, 2008
Tuesday, December 2, 2008
Have you ever...?
For fun and to take a break from the stresses of the holidays, I decided to take part in this questionnaire from Maier Memories
Have You Ever?
Just for grins and giggles. Copy this list and put it on your blog. If you've done it, bold it.
1. Started your own blog
2. Slept under the stars
3. Played in a band
4. Visited Hawaii
5. Watched a meteor shower
6. Given more than you can afford to charity
7. Been to Disneyland (and DisneyWorld!)
8. Climbed a mountain
9. Held a praying mantis
10. Sang a solo
11. Bungee jumped
12. Visited Paris
13. Watched a lightning storm at sea
14. Taught yourself an art from scratch
15. Adopted a child
16. Had food poisoning
17. Walked to the top of the Statue of Liberty
18. Grown your own vegetables
19. Seen the Mona Lisa in France
20. Slept on an overnight train
21. Had a pillow fight
22. Hitch hiked
23. Taken a sick day when you’re not ill --ssshhh!
24. Built a snow fort
25. Held a lamb
26. Gone skinny dipping -TMI?
27. Run a Marathon
28. Ridden in a gondola in Venice
29. Seen a total eclipse
30. Watched a sunrise or sunset
31. Hit a home run -- I'm guessing that one on the Wii doesn't count?
32. Been on a cruise
33. Seen Niagara Falls in person
34. Visited the birthplace of your ancestors
35. Seen an Amish community
36. Taught yourself a new language
37. Had enough money to be truly satisfied--most of the time
38. Seen the Leaning Tower of Pisa in person
39. Gone rock climbing
40. Seen Michelangelos David
41. Sung karaoke - if that's what you want to call it!
42. Seen Old Faithful geyser erupt
43. Bought a stranger a meal at a restaurant
44. Visited Africa
45. Walked on a beach by moonlight
46. Been transported in an ambulance
47. Had your portrait painted
48. Gone deep sea fishing
49. Seen the Sistine Chapel in person
50. Been to the top of the Eiffel Tower in Paris
51. Gone scuba diving or snorkeling
52. Kissed in the rain
53. Played in the mud
54. Gone to a drive-in theater
55. Been in a movie
56. Visited the Great Wall of China
57. Started a business
58. Taken a martial arts class
59. Visited Russia
60. Served at a soup kitchen
61. Sold Girl Scout Cookies
62. Gone whale watching
63. Got flowers for no reason
64. Donated blood, platelets or plasma
65. Gone sky diving
66. Visited a Nazi Concentration Camp
67. Bounced a check (not that I'm proud of it, but I have)
68. Flown in a helicopter
69. Saved a favorite childhood toy
70. Visited the Lincoln Memorial
71. Eaten Caviar
72. Pieced a quilt
73. Stood in Times Square
74. Toured the Everglades
75. Been fired from a job --not proud of this, either!
76. Seen the Changing of the Guards in London
77. Broken a bone
78. Been on a speeding motorcycle
79. Seen the Grand Canyon in person
80. Published a book
81. Visited the Vatican
82. Bought a brand new car
83. Walked in Jerusalem
84. Had your picture in the newspaper
85. Read the entire Bible
86. Visited the White House
87. Killed and prepared an animal for eating
88. Had chickenpox
89. Saved someone’s life
90. Sat on a jury
91. Met someone famous
92. Joined a book club
93. Lost a loved one
94. Had a baby
95. Seen the Alamo in person
96. Swam in the Great Salt Lake
97. Been involved in a law suit
98. Owned a cell phone
99. Been stung by a bee
100. Read an entire book in one day - It's been a while...The Bridges of Madison County was the last book that I've read in one day. That's sad to me. I love to read but rarely have the time to do a lot of it in one day.
There are many more on this list that I hope to do one day!
Why not take a moment out of your busy day to post this on your blog! Let me know if you do. :)
Tuesdays with Dorie ~ Linzer Sables
Noskos of Living the Life chose Linzer Sables as this week's Tuesdays With Dorie recipe.
In my opinion, this cookie was just ok, nothing special. I had no problems following the recipe the way it was written, although I only had to bake my cookies 6 1/2 minutes. I chose a raspberry preserves as the filling for these cookies. I really didn't like the taste of the cookies with the cinnamon & cloves mixed with the raspberry filling. Perhaps another filling or even different ground nuts (I used walnuts) would've made them taste better to me.
Anyway, here they are:

Monday, November 24, 2008
Happy Thanksgiving from my blog to yours!
I'm saying an early Happy Thanksgiving to all of my blogging friends! I'll be back posting again on Friday!
Have a happy and safe holiday wherever you are spending it.
Tami
Have a happy and safe holiday wherever you are spending it.
Tami
Thursday, November 20, 2008
Food for Thought Book Club ~ Vote for the December/January Book!
Hi to all of my fellow book worms!
With everything going on during December, it was decided that we will read this book over the next 2 months (Dec & Jan).
I am honored to have been chosen to pick the books that we will be voting on for the next Food for Thought Book Club book.
It was hard to narrow my choices down to 3 picks - I actually had 5 picked out. :)
Here are the 3 that I've chosen:
Tender at the Bone by Ruth Reichl
Talking with My Mouth Full: Crab Cakes, Bundt Cakes, and Other Kitchen Stories by Bonnie Wolf
Candyfreak : A Journey through the Chocolate Underbelly of America by Steve Almond
Please cast your vote here by November 29 by simply posting your name/blog and your pick. I will announce the winning book on November 30!
If you would like to join us in the Food for Thought Book Club, you can check it out here.
I hope that everyone has been enjoying November's book!

Monday, November 17, 2008
TWD ~ Chocolate Arborio Rice Pudding
This week's Tuesdays with Dorie recipe is Vanilla and/or Chocolate Arborio Rice Pudding, chosen by Isabelle from Les gourmandises d’Isa . You will find this recipe posted on her blog so be sure to check it out!
After reading over the recipe, I set out to cook it. I started out deciding to make the batch 1/2 vanilla and 1/2 chocolate. Once I mixed up the vanilla, I didn't like the way it looked so I stirred it into the chocolate, added another ounce of chocolate to the whole mix and stirred it altogether. I used semi-sweet chocolate because that's what I had on hand.
When the pudding didn't get thick like I thought it should've, I searched out the link for it on TWD to read the comments by those who had previously made it. (Quick thanks to everyone who posts what works for them and what doesn't on those links!!) I realized that I hadn't cooked it long enough ~ there's an error posted for the cooking time - it should be 55 minutes instead of the posted 35 minutes. So I took my liquid pudding out of the refrigerator and returned it to the pot to continue cooking it. I cooked mine for another 30 minutes and by then, it had turned into a creamy pudding that smelled like hot chocolate! I cooled it for about 1o minutes before dishing it out and setting it in the refrigerator to chill.
Wanna bite?
 I am so happy that this turned out to be yummy!

Here you can read about all of the comments on this week's recipe and see the TWD blogroll, too.
After reading over the recipe, I set out to cook it. I started out deciding to make the batch 1/2 vanilla and 1/2 chocolate. Once I mixed up the vanilla, I didn't like the way it looked so I stirred it into the chocolate, added another ounce of chocolate to the whole mix and stirred it altogether. I used semi-sweet chocolate because that's what I had on hand.
When the pudding didn't get thick like I thought it should've, I searched out the link for it on TWD to read the comments by those who had previously made it. (Quick thanks to everyone who posts what works for them and what doesn't on those links!!) I realized that I hadn't cooked it long enough ~ there's an error posted for the cooking time - it should be 55 minutes instead of the posted 35 minutes. So I took my liquid pudding out of the refrigerator and returned it to the pot to continue cooking it. I cooked mine for another 30 minutes and by then, it had turned into a creamy pudding that smelled like hot chocolate! I cooled it for about 1o minutes before dishing it out and setting it in the refrigerator to chill.
Wanna bite?
 I am so happy that this turned out to be yummy!
Here you can read about all of the comments on this week's recipe and see the TWD blogroll, too.
Thursday, November 13, 2008
November Cookie Carnival ~ The Ultimate Chewy & Soft Chocolate Chunk Cookies

November's Cookie Carnival recipe, The Ultimate Chewy and Soft Chocolate Chunk Cookies, comes from Regan Daley's book "In The Sweet Kitchen".
These cookies turned out to be very well liked by my family - so much so, that I'm working on a second batch for tonight. I used Ghirardelli chocolate chips in my cookies because the store I was in didn't carry chocolate chunks and I didn't feel like chopping up chocolate at the time. These chips worked just fine but I do think that the chunks would give the cookies a prettier appearance. For my next batch, I'm going to use the chunked chocolate and then I will post pictures of them for a comparison.
To me, there's nothing better than a soft, chewy chocolate chip cookie that is full of chips that are soft when you bite into it. These cookies met my requirements - they were chewy, ooey and gooey! YUM!

The Ultimate Chewy and Soft Chocolate Chunk Cookies
INGREDIENTS
1 cup unsalted butter at room temp
1 cup tightly packed light brown sugar
1/2 cup granulated sugar
2 large eggs
1 1/2 tsps. pure vanilla extract
3 cups plus 2 tbsp. all-purpose flour
1 tsp. baking soda
1/2 tsp. salt
16 oz. flavorful bitter or semi-sweet chocolate, coarsely chopped
INSTRUCTIONS
1. Preheat oven to 350 F. Line two baking sheets with parchment paper, or lightly butter them, and set aside. In the bowl of an electric mixer, or stand mixer fitted with paddle attachment, or a large bowl if mixing by hand, cream the butter and sugars until light and fluffy. Add the eggs, one at a time, beating well and scraping down the sides of the bowl after each addition. Beat in the vanilla.
2. Sift the flour, baking soda and salt together in a small bowl. Add
the dry ingredients to the butter-sugar mixture, and mix until just
combined. Fold in the chocolate chunks. 3. Using your hands, shape knobs of dough about the size of a large walnut and place them 2 inches apart on the baking sheets. (I use a small cookie scoop). Stagger the rows of cookies to ensure even baking. Bake 12-15 for smaller cookies, 14-17 for larger ones or until the tops are a light golden brown. If the cookies are neither firm nor dark when they are removed from the oven, they will cool chewy and soft. Cool the cookies on the sheets
for 5 minutes, then transfer to wire racks to cool
completely.
If somehow they don't get inhaled immediately, they may be stored airtight at room temperature for up to one week.
No way are these going to last for a week unless you hide them from everyone! lol!
Tuesday, November 11, 2008
New Blog Award & I've been tagged for a Commenters Meme!
WooHoo! Check out my new award! My good friend Amanda from Amanda's Cookin' gave it to me. She actually gave it to me a couple of weeks ago but then I got sick and was out for a while so I'm posting it now! She is such a sweetie! If you haven't checked out her cooking blog yet, do so now because she whips up some great stuff! She's also one of the most crafty people that I know. Check out her craft blog at Amanda's Crafty Creations. Thanks bunches, Amanda!

It wouldn't be too nice of me to hold onto this award and not share it with anyone, right? Since I am totally into "sharing the love", I'm sharing this awards with these fellow bloggers:
Maier Memories because her blog makes me smile. I can totally relate to some of the things that's going on in her life! :)
Barbara Bakes because she has a great blog with lots of great pictures to go with her recipes. It's hard to resist trying to reach through the screen to grab something that's laying on a plate!
Mom's Fridge because she has the best laid out menus that I have ever seen. When I get stuck in a rut for dinner ideas, I always pop over to take a look at Barb's blog. She gets rave reviews from everyone who tries her recipes!
Amanda's Crafty Creations because this blog is full of beautiful crafts that show off Amanda's talents, plus she add easy crafts that Parents and Grandparents can do with their kids!
The Omnomicon because her blog is waaay out there and she tells it like it is! Definitely not for the timid! Her writings crack me up but her pictures are what drew me in to begin with.
I hope that all of you enjoy your new award! Now it's your turn to share the love!
**********
Tonight I was tagged by Barbara from Barbara Bakes to do a Meme! :)
Being fairly new at this blogging stuff, I will admit that I had no idea what a Meme was - but knowing Barbara's blog and the way she comments on my blog, I knew that it had to be something fun.
I Googled it and found out that a meme is: An idea that, like a gene, can replicate and evolve. For more interesting info. on this, check out The Daily Meme. Ok...interesting! On to Barbara's blog to see what I have to do.
The Commenters Meme
This is a great idea for a Meme because it shows commenters that you care about the people who visit your blog and take the time to leave comments!!
The rules:
1. List the last ten people who have commented on your blog
2. If you’re on my list then you should do the meme on your blog, too
10 Blogs, 15 Questions.
The last 10 people to leave comments on my blog:
1. Stephanie from Ice Cream Before Dinner
2. Queen B from Cozy Kitchen by the Sea
3. The Maier kids' Mom (**blushing** I just realized I don't know your first name) from Maier Memories
4. Amber from This Crazy Life
5. Barbara from Barbara Bakes!
6. Maria from Two Peas and Their Pod
7. Maryann from Finding La Dolce Vita
8. Aggie from Aggie's Kitchen
9. Michelle from Something New is Cooking
10. Aleta Meadowlark from The Omnomicon
1: What is your favorite post from number 3’s blog? I swear that if you change the ages of the kids in My Girl's... Don't Be Fooled and make the older one a boy, she was writing about my kids!
2. Has number 10 taken any pictures that have moved you? The food pictures throughout her blog move me ...right into the kitchen to look for something to eat! No kidding! The food pics are great!
3. Does number 6 reply to comments on their blog? I'm not really sure. I've just recently found her blog and haven't had a good chance to check it out. My quick look over though, I've been missing a lot!
4. Which part of blogland is number 2 from? Queen B. is lives in the U.S. by the sea! lol!
5. If you could give one piece of advice to number 7 what would it be? My advice to Maryann would be to never stop blogging about real Italian food! I'm from up north but I live in the south now. I MISS real Italian food!
6. Have you ever tried something from number 9’s blog? Not yet but I plan on trying her recipe for Creamy Chicken Pockets real soon. I'm pretty sure that I will find a lot of recipes on her blog that my family will enjoy!
7. Has number 1 blogged something that inspired you? Stephanie has a quote in her profile that holds so very true to me... "Sometimes the things that you liked the best and that have meant the most to you are the things that meant nothing at all to you when you first heard or saw them." - Red Grooms
8. How often do you comment on number 4’s blog? Not nearly enough but I do get to talk to Amber through a local Moms group website that we both belong to! In fact, that's where I met her!
9. Do you wait for number 8 to post excitedly? I've just recently found Aggie's blog but I am really looking forward to checking it all out. Her recent recipes look great!
10. How did number 5’s blog change your life? It's funny that Barbara should work out to be #5! She is the first person to send me a Meme and that pushed me into learning something new today. :) Her blog is great and I look forward to reading it when she posts new recipes.
11. Do you know any of the 10 bloggers in person? I know Amber from a local Moms group website but we haven't met in person yet. :) I hope to meet her one day soon, though!!
12. Do any of your 10 bloggers know each other in person? I don't think so but I'm not 100% sure about that.
13. Out of the 10, which updates more frequently? The Maier kids' Mom and Amber have been posting nearly every day with one or more updates!
14. Which of the 10 keep you laughing? Maier Memories and The Omnomicon. It's great because they both make me laugh for very different reasons! How lucky am I to have many reasons to laugh and smile!
15. Which of the 10 has made you cry (good or bad tears)? I've shared some prayers and some tears with some of Maier Memories family stories.
Monday, November 10, 2008
Game Time Food - Pepperoni Rolls
MMM! Nothing beats warm pepperoni rolls right out of the oven to munch on during a football game. We used to be able to find these in any bakery on Sunday afternoons in Pa. but not here. Thankfully they are easy to make at home using only 3 ingredients.

You need:
2 tubes of refrigerated French Bread
1 package of sliced pepperoni or turkey pepperoni
6 mozzarella cheese sticks, each cut in 1/2, making 12 sticks
Preheat oven according to package directions for the bread. Lightly grease a large baking sheeet and set aside.
Remove bread from tubes but do not unroll. Cut each loaf into six equal pieces. Roll or flatten each piece of dough into a small rectangle. Working from one of the long ends of each rectangle, lay 6 pieces of pepperoni on top of the dough. Slice one cheese stick in 1/2, then lay end to end on top of the pepperoni. Fold dough up and over the cheese and pepperoni, pressing the ends together tightly to seal.
Lay the pepperoni rolls, seam side down, onto the baking sheet. Bake for 20-25 minutes.
If there's any left over, wrap them well in plastic wrap, and then pop them into the freezer. Reheat in the microwave.
 MMM! Look at the warm, gooey cheese! These don't last long around here!
You need:
2 tubes of refrigerated French Bread
1 package of sliced pepperoni or turkey pepperoni
6 mozzarella cheese sticks, each cut in 1/2, making 12 sticks
Preheat oven according to package directions for the bread. Lightly grease a large baking sheeet and set aside.
Remove bread from tubes but do not unroll. Cut each loaf into six equal pieces. Roll or flatten each piece of dough into a small rectangle. Working from one of the long ends of each rectangle, lay 6 pieces of pepperoni on top of the dough. Slice one cheese stick in 1/2, then lay end to end on top of the pepperoni. Fold dough up and over the cheese and pepperoni, pressing the ends together tightly to seal.
Lay the pepperoni rolls, seam side down, onto the baking sheet. Bake for 20-25 minutes.
If there's any left over, wrap them well in plastic wrap, and then pop them into the freezer. Reheat in the microwave.
MMM! Look at the warm, gooey cheese! These don't last long around here!
Bookmarked Recipes ~ Upside-Down Strawberry Shortcake
My Bookmarked Recipe for this week is Upside-Down Strawberry Shortcake from Taste of Home.

Although I found it in one of their magazines, it can be found online here.
This cake was super simple to make and really, really good. I whipped this up this morning while waiting on the maintenance guys who were coming to check out our furnace. The cake would be equally delicious, I'm sure, made with blackberries, raspberries, peaches...ect. I'm going to try it with blackberries the next time. Yum!
Ingredients:
1 cup miniature marshmallows
1 package (16 ounces) frozen sweetened sliced strawberries, thawed
1 package (3 ounces) strawberry gelatin
1/2 cup shortening
1-1/2 cups sugar
3 eggs
1 teaspoon vanilla extract
2-1/4 cups all-purpose flour
3 teaspoons baking powder
1/2 teaspoon salt
1 cup milk
Fresh strawberries and whipped cream
Directions:
Sprinkle marshmallows evenly into a greased 13-in. x 9-in. baking dish; set aside. In a small bowl, combine strawberries and gelatin powder; set aside. In a large mixing bowl, cream shortening and sugar until light and fluffy. Add the eggs, one at a time, beating well after each addition. Beat in vanilla. Combine flour, baking powder and salt; add to creamed mixture alternately with milk, beating well after each addition. Pour batter over the marshmallows. Spoon strawberry mixture evenly over batter. Bake at 350° for 45-50 minutes or until a toothpick inserted near the center comes out clean. Cool on a wire rack. Cut into squares. Garnish with strawberries and whipped cream. Yield: 12-16 servings.
The changes that I made to the recipe:
I halved the recipe and baked the cake in a 9x9 pan.
I used unsweetened frozen strawberries + sugar-free Jello. This was plenty sweet enough this way.
I topped it with Cool Whip instead of fresh whipped cream.
The cake baked for 47 minutes.
Enjoy!
Saturday, November 8, 2008
Cooking with Alicia & Annie ~ Johnny Cake Cornbread
In an attempt to find the perfect cornbread to go along with soups and chilis, I decided to give this Johnny Cake Cornbread from Alicia's recipes, a try.
This will also add another entry into the Cooking with Alicia & Annie November Blog Event!
This will also add another entry into the Cooking with Alicia & Annie November Blog Event!
 I followed the directions exactly as they are written. The cornbread is quick to mix up and bakes up beautifully.
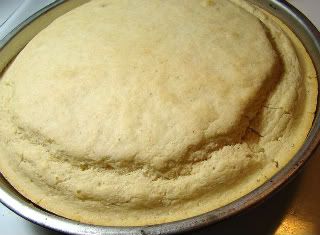 If you like dense cornbread, you'd probably like this one.
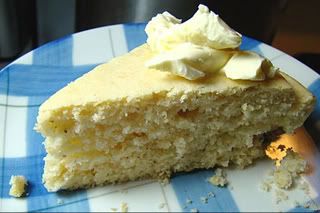 Although this one didn't turn out to be a family favorite, I would say that overall, it's good.
Wednesday, November 5, 2008
Cooking with Alicia & Annie ~ Christmas Apple Cake
We started our Christmas celebrating early this year. lol! It started with tonight's dessert - Christmas Apple Cake from Alicia's Recipes. This is another entry into the Cooking with Alicia and Annie Blogging Event.

I'm not sure where they came up with the name of this cake - maybe a family tradition of making to give as gifts for the holidays? Whatever the case may be, the cake sure is good!
I made one 9 x 9 cake and 12 lg. muffins from this mix. Both were very moist and delicious.


I made some changes to the original recipe:
I used 1/2 C. apple cider in place of the rum. I also soaked the raisins in 3/4 C. of very hot apple cider since the juice and raisins both go into the mix.
I used 2 C. of raisins in place of the 1 C. raisins + 2 C. of nuts. I did not increase the liquid above on the raisins when it came time to soak them.
I used 3 tsp. of apple pie spice instead of pumpkin pie spice.
I filled 12 lg. cupcake liners full of batter. With the remaining batter, I filled a 9 x 9 glass dish. The muffins baked for 18 minutes @ 350*. The cake baked for 48 minutes @ 350*.
These muffins would be great for breakfast. The cake would hold up great packed in lunches.
For a pretty dessert, drizzle with caramel apple topping that has been heated in the microwave.


I'm not sure where they came up with the name of this cake - maybe a family tradition of making to give as gifts for the holidays? Whatever the case may be, the cake sure is good!
I made one 9 x 9 cake and 12 lg. muffins from this mix. Both were very moist and delicious.
I made some changes to the original recipe:
I used 1/2 C. apple cider in place of the rum. I also soaked the raisins in 3/4 C. of very hot apple cider since the juice and raisins both go into the mix.
I used 2 C. of raisins in place of the 1 C. raisins + 2 C. of nuts. I did not increase the liquid above on the raisins when it came time to soak them.
I used 3 tsp. of apple pie spice instead of pumpkin pie spice.
I filled 12 lg. cupcake liners full of batter. With the remaining batter, I filled a 9 x 9 glass dish. The muffins baked for 18 minutes @ 350*. The cake baked for 48 minutes @ 350*.
These muffins would be great for breakfast. The cake would hold up great packed in lunches.
For a pretty dessert, drizzle with caramel apple topping that has been heated in the microwave.
Cooking with Alicia & Annie ~ Baked Macaroni & Cheese Casserole
I'm finally able to sit at my keyboard and type once again. It's been a rough week for us at my house with everyone fighting Bronchitis. Finally I'm hoping that we are nearing the end of being sick! YAY!
I baked 2 whole chickens today so that I would have chicken for tonight's dinner and then enough to make a couple of other dinners over the next few days.
I found a really easy side dish called Baked Macaroni & Cheese Casserole from Annie's website that I'm going to post as an entry into this month's Cooking with Alicia & Annie Blog Event.


Annie's Original Recipe with my changes and notes below it:
1 lb. elbow macaroni, cooked according to pkg. directions
1 pkg. Kraft sharp cheese, grated
1 can cream of chicken OR cream of mushroom soup (Campbell's)
Bread crumbs
Milk
Instructions:
Mix soup with 1 can of milk in a bowl.
Butter or spray a large casserole dish.
Put alternating layers of the macaroni, cheese, and the soup into dish. Top with bread crumbs.
Bake 1 hour at 350 degrees.
Serves 6.
I baked 2 whole chickens today so that I would have chicken for tonight's dinner and then enough to make a couple of other dinners over the next few days.
I found a really easy side dish called Baked Macaroni & Cheese Casserole from Annie's website that I'm going to post as an entry into this month's Cooking with Alicia & Annie Blog Event.

Annie's Original Recipe with my changes and notes below it:
1 lb. elbow macaroni, cooked according to pkg. directions
1 pkg. Kraft sharp cheese, grated
1 can cream of chicken OR cream of mushroom soup (Campbell's)
Bread crumbs
Milk
Instructions:
Mix soup with 1 can of milk in a bowl.
Butter or spray a large casserole dish.
Put alternating layers of the macaroni, cheese, and the soup into dish. Top with bread crumbs.
Bake 1 hour at 350 degrees.
Serves 6.
******
My changes and notes: I doubled the ingredients and followed the recipe "as is" using cream of mushroom soup. I didn't use the breadcrumbs on top because my family doesn't like casseroles topped that way. I only baked this dish for 45 minutes, and then I stuck it under the broiler for 3 minutes to brown it. I assumed that "one package" of cheddar cheese was one 8 oz block. When I make this again, I will add one more cup of chunked cheese to it. I will try it the next time with the cream of chicken soup.
Both of my kids loved this dish. They gave it rave reviews! My husband said that he liked it, too. I thought that the cream of mushroom soup was sort of overpowering in it and that it could've used more cheese. I'll be keeping this one on hand to make on those nights were you need a quick meal but don't have much on hand to throw something together. This dish contains the basic ingredients most of us have in our kitchens. You could even add some chopped chicken or tuna right to the dish and stir in a veggie...you would have a one dish meal. :)
Wednesday, October 29, 2008
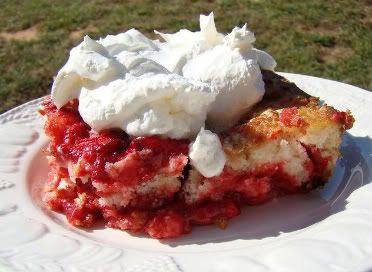
Apple Pudding
My husband reminded me the other night that I couldn't allow fall to go by without making apple pudding for him. I've been so caught up in searching out new recipes to try, I'd forgotten about one of his favorites.
I'm not sure where the name of this recipe came from because it's been handed down from generation to generation in his family. Even my mother-in-law wasn't sure were the name had originated. It's not a pudding at all....it's baked apples with a cake-like topping. Whatever the name, it's called comfort food filled with lots of memories to my husband.
For the best results, use Granny Smith apples--lots of them! In these pictures, I've used 4 really large apples but that wasn't nearly enough after they had cooked down. I would recommend using at least 8 (yes, really!) large Granny Smith apples. Pile them high in the pan (and over the top of it) because they will cook down.

Apple Pudding
8x8 dish
8 - lg. Granny Smith apples, sliced thin
1/3 – ½ C. sugar
3 tsp. apple pie spice
Preheat oven to 350*
Preparing Apples:
Slice apples thin and pile high in dish. Sprinkle with sugar & spices and set in oven so that the apples can start cooking while you are preparing the cake topping.
 I made two errors right off the bat...I chopped up the apples instead of thinly slicing them and I didn't use nearly enough of them to (over)fill the pan. Oh well, we gobbled it up nonetheless.

Cake Topping
Sift together in a bowl:
1 ½ C. flour
2 tsp. baking powder
½ tsp salt
Cream together in another bowl:
1/3c. sugar
¼ C. butter flavored shortening
1 egg, whipped
Alternate flour mix with ¾ c. milk into the creamed sugar mixture. Spoon on top of apples. Bake for approx. 35 minutes or until light golden brown.
 Enjoy!
Cooking with Alicia & Annie Blog Event for October - I won!!
 I am such a happy camper today! I was notified that my entry for Amish Funnel Cakes was randomly chosen to win the Taste of Home Cookbook that was offered for entering the Cooking with Alicia & Annie Blog Event. Thank you so much, Amanda! I'm sure I will put this cookbook to good use!
If you haven't checked out this blog event yet, be sure to do so. November's prize is really cool, too! You can enter as many times as you want, so get in there and do what you do best...cook! The rules are simple to follow and there are tons of recipes to choose from.
I'll see ya there in November!
Tuesday, October 28, 2008
TWD ~ Chocolate - Chocolate Cupcakes
Today's Cooking with Dorie recipe is for Chocolate - Chocolate Cupcakes. You can check out the recipe for these chocolatey cupcakes on Clara's blog, IHeartFood4Thought.
Even though the recipe is suggested to be for adults to enjoy more so than children, I made the cupcakes for my son's 11th birthday. I made them more kid-friendly by stuffing the cupcakes with a rich, fluffy buttercream icing and then topping the ganache with colorful candy sprinkles.

Even though the recipe is suggested to be for adults to enjoy more so than children, I made the cupcakes for my son's 11th birthday. I made them more kid-friendly by stuffing the cupcakes with a rich, fluffy buttercream icing and then topping the ganache with colorful candy sprinkles.

When I first made these cupcakes I was extremely disappointed in them--the cake seemed to be missing "something" and I had trouble with the ganache clumping up in the bowl. The only part of these cupcakes that seemed to be any good was the buttercream icing that I used to fill the center of each cupcake.
I was determined to try to make these work!
Here is what I did:
I mixed the batter as instructed. The only difference to my recipe is that I grabbed semi-sweet chocolate instead of bitter-sweet chocolate by mistake, so that is what I used. I altered the cooking time to 17 minutes @ 350*. I tried rushing the process by trying to fill the cupcakes with the buttercream filling before they were completely cool--what a mistake! The cupcakes fell apart. At this point, I was really getting aggrivated so I decided to walk away and give the cupcakes time to cool. This was a good thing! The cupcakes held together much better when they were completely cool.
I filled the cupcakes with this recipe for
buttercream icing:
1 stick of butter, softened
1 TBSP vanilla
1 3/4 C. powdered sugar
1/8 C. whipping cream
Whip butter until fluffy. Mix in vanilla. Alternate mixing in powdered sugar and whipping cream until the icing is fluffy and smooth- this could take several minutes. Use an icing bag to pipe icing into cupcakes.
I made the ganache as directed but I had trouble with it clumping and not staying smooth enough to ice the cupcakes. I added 2 tsp. of milk to the chocolate mixture and then microwaved it for 15 seconds. After stirring it vigorously for about 3o seconds, the consistency was perfect. I spooned the ganache on top of each cupcake, allowing some of it to run down over the sides. Then a splash of colored candy toppings made them look festive.
We were running short on time due to having plans to take my son out for pizza for his birthday, so I left the cupcakes on the rack to dry.
When we returned from our trip, my son was eager to try one of his cupcakes. The time away that allowed the cakes to absorb some of the moisture from the buttercream filling, and combined with the ganache, it turned the cupcakes into a special dessert. Since the cupcake itself is not overly sweet, it made for a great combination with the sweet filling and chocolate topping.
I'm glad that I decided to follow through with this recipe instead of giving up on it.

Subscribe to:
Posts (Atom)