Here's our menu for this coming week:
Sunday - spaghetti
Monday - Mexican stuffed pepper casserole w/ cornbread
Tuesday - pizza buns w/ salad
Wednesday - grilled ham & turkey sandwiches w/ basil rice pilaf
Thursday - Greek roasted chicken w/ potatoes & carrots
Friday - margarita pork chops w/ fried noodles
Saturday - fish sandwiches
With school right around the corner, now's the time to start thinking about lunch box fillers.
Here's a few ideas that work well:
pizza roll-ups
trail mix brownies
fruit, meat & cheese kabobs
chili cheese dog tortilla sticks
Linking up with:
Menu Plan Monday
Sunday, July 31, 2011
Wednesday, July 27, 2011
Honey Bun Cake

I love recipes that can pull double duty as a sweet treat for breakfast or as a simple dessert. This recipe for honey bun cake does just that. It's a simple recipe that kids can help prepare. I found it posted at FamilyCorner.com by dyllpickle00. (Her username makes me smile!).
Huney Bun Cake
posted at FamilyCorner.com by dyllpickle00
For cake:
1 box yellow cake mix
3/4 c. oil
1 c. sour cream
In a lg. bowl, stir together dry cake mix, oil and sour cream. Batter will be thick.
Spread the batter into the bottom of a 9 x 13 cake pan.
Prepare brown sugar topping recipe (below) and swirl over cake batter.
Bake @ 350* for 40 minutes or until a toothpick stuck in the middle of the cake comes out clean.
Prepare glaze recipe (below) and pour on top of cake while hot.
Serve warm.
For brown sugar topping:
1/2 c. brown sugar
4 1/2 tsp. cinnamon
4 1/2 tsp. evaporated milk
Stir together and swirl over cake.
For glaze:
Stir together 1 c. powdered sugar, 4 tbsp. evaporated milk and 1 tsp. vanilla.
Optional: melt 1/2 -1 cup chocolate chips and swirl over the top of the cake while it is still hot.

Linking up to:
Goose Berry Patch Cookout Favorites
The Ultimate Fudge Brownie Chocolate Chip Oreo Cookie Bars

Is that title a mouthful or what?
This cookie certainly stands up to all of the hype that it's receiving all over the Internet. I first saw pictures of this decadent dessert at Betcha Can't Eat Just One. Katie was able to kick it up another notch by adding dulce de leche to her bars. The original recipe comes from Amanda@ Kevin and Amanda. I bow to their creativity. :)
At first I couldn't imagine even biting into something like this but then, I couldn't stop thinking about it. That's me, when something makes you say "Why would you do that?!?" to food, I just have to try it. It's a lot like the time I just had to try a Krispy Kreme hamburger when we took our kids to a baseball game here in town. haha!
This was a family-involved dessert. I mixed up the cookie batter, my son made the brownies and my daughter lined up the Oreos. We had a lot of fun assembling this dessert but even more fun eating it. :) I added the hot fudge into the brownie mix (from Amanda's recipe) plus the caramel (from Katie's recipe). The results were terrific. Even my husband liked this one.
I'm planning on freezing the leftovers to use in a trifle for another time.

The Ultimate Fudge Brownie Chocolate Chip Oreo Cookie Bars
adapted from Betch Can't Eat Just One & Kevin & Amanda
1 c. butter, softened
1 c. sugar
3/4 c. brown sugar
2 lg. eggs
1 tbsp. vanilla extract
2 1/2 c. flour
1 tsp. baking soda
1 tsp. salt
2 c. semi sweet chocolate chips
1 pkg. Oreos - I used store brand
1/2 c. caramel sauce - I used ice cream topping
1 lg. pkg. brownie mix + ingredients on the box
1/4 c. hot fudge
Preheat oven to 350*.
Line a 9 x 13 dish with waxed paper. Spray with non-stick cooking spray and then set aside.
In a large bowl, beat together butter and sugars until creamy. Add eggs, one at a time, mixing well. Mix in vanilla.
In another bowl, sift together flour, baking soda and salt. Mix into the wet mixture until just combined.
Spread the cookie dough into the bottom of the 9 x 13 dish that you've lined with waxed paper.

Layer Oreos over the cookie dough.

Pour the caramel sauce over the Oreos.

Mix together brownies according to the directions on the box. Stir in 1/4 c. hot fudge and mix well.
Pour the brownie mixture over the Oreos. Bake for 45 - 55 minutes.

Cool in pan for 10 minutes. Remove the cookie bars to a cooling rack and remove the waxed paper from around the edges of the bars.
Allow to finish cooling for at least another 15 minutes. Cut into small pieces for serving.
Store leftovers in a container with a tight-fitting lid. These bars can also be frozen. Thaw on counter.
Monday, July 25, 2011
Menu Plan for 7/24 - 7/30
I have a busy week ahead of me so our menu isn't that complicated. I'm trying some new recipes so keep an eye out for a thumbs up or down for them.
Sunday - grilled chicken legs, baked potatoes, and spinach/carrots
Monday - roasted chicken with wild rice soup (using leftover grilled chicken)
Tuesday - crockpot goulash (didn't make it last week)
Wednesday - blt pasta
Thursday - Mediterranean chicken salad with Asiago pepper bread (bread machine recipe)
Friday - rigatoni with new red sauce recipe and roasted pepper salad
Saturday - sloppy joes
Some delicious side dishes and desserts ideas:
bow tie pasta salad
four cheese and bacon mac n cheese
broiled tomato and goat cheese salad
lemon choc. chip cake mix cookie bites
toffee choc. chip pie
Have a great week, everyone!
Linking up with:
Menu Plan Monday
Thursday, July 21, 2011
Chocolate Malted Brownies

These chocolate malted brownies are an old timey recipe that will take some back to their younger days. One of the main ingredients is chocolate malt powder, aka Ovaltine. In some ways I feel like I missed out on something since we never drank Ovaltine as kids. We were strictly a Nesquik family. lol!
The recipe is from the cutest little cookbook called "Mary Engelbreit's Cookie Cookbook". I picked it up at our local thrift store a couple of weeks ago. In true Mary Engelbreit style, the cookbook is decorated with lots of colorful, playful pictures, along with real pictures of the recipes. To me, it was a nice find for 99 cents.
There's a nice, light, chocolately malt flavor throughout the brownies but it's the "icing" that really makes the brownies good. It's more of a thin sauce than an icing and it flows down into the nooks and crannies of the brownie almost turning it into a molten lava cake. The sprinkles are my daughter's touch. Everything just tastes better to her when there are sprinkles on it. :)

Chocolate Malted Brownies
from Mary Engelbreit's Cookies Cookbook
Brownies
1/2 c. all-purpose flour
1/2 tsp. baking powder
1/4 tsp. salt
1/4 c. milk
1/4 c. malt powder, such as Ovaltine
1 tsp. vanilla
1/4 c. unsalted butter, at room temp.
1 c. sugar
2 lg. eggs
3 oz. unsweetened chocolate, melted and cooled
Glaze
4 oz. milk chocolate, coarsely chopped
1/4 c. heavy cream
2 tbsp. malt powder
1 1/2 tsp. light corn syrup
Preheat oven to 350*
Line a 9 inch square pan with foil and grease the foil.
For Brownies:
In a med. bowl, whisk together flour, baking powder and salt.
In a small bowl, stir together milk, malt powder and vanilla. Set aside
In a large bowl, beat together butter and sugar until light and fluffy.
Beat in eggs.
Slowly add in flour, alternating with the melted chocolate and milk mixture. Beat until well blended.
Scrape the batter into the prepared pan and smooth the top.
Bake for 20 - 25 minutes. Transfer the pan to a wire rack to cool completely.
For glaze:
In a small saucepan, mix together chocolate, cream, malt powder and corn syrup. Stir over low heat until smooth. Remove from heat and cool until thickened but still pourable. I did this step in the microwave.
Place a cutting board on top of the brownie pan, invert, remove the pan and carefully pull away the foil. Turn the brownies right side up. I skipped this step. Pour the glaze over and spread it evenly to cover the top of the brownies. Sprinkle with candy sprinkles, if desired. Let stand until set.
Tuesday, July 19, 2011
Brunswick Stew

Being from the north, I had no idea what Brunswick Stew was until we moved to North Carolina. I saw it on a menu in a bbq place that was near where we lived at the time, in Kernersville. It's a "stew" of sorts that might or might not contain tomatoes. It usually contains lima beans, corn and at least one type of meat. I'm convinced that most places probably use leftovers to make this "stew" because it's never quite the same each time you order it. Nevertheless, I really like it.
Of course, I'm the only member of our family that will eat it...until now. I've adapted a recipe from a cookbook called "Quick Fixes with Mixes" from the editors of Southern Living. Their recipe calls for shredded pork + bbq sauce. Instead, I used leftovers from this over-the-top-delicious Jack Daniel's pulled pork bbq that we'd eaten earlier in the week. The pulled pork was made with homemade Jack Daniels bbq sauce. I bought frozen lima beans thinking that I would add them into my stew since I'm the only one who will eat them....I forget all about them until we were half way through the meal. That was a bummer but it didn't take away from this great-tasting "stoup" (if I can borrow that word from Rachel Ray because this wasn't a soup but it wasn't as thick as a stew, either.) But the biggest change that I made was to omit the cubed hashbrowns and instead, serve the soup over cooked elbow macaroni. I can't remember any of the Brunswick stew that I've eaten at different locations ever having any type of potatoes in it. We didn't miss the potatoes one bit.
We enjoyed this version of Brunswick stew. It was a great way to use up leftovers. The best part was that I cooked it all in my crockpot, staying nice and cool in during this heat wave!

Crockpot Brunswick Stew
adapted from Quick Fixes with Mixes
my version in bold text
3 lbs. shredded cooked pork - I used about 2 lbs from leftover my Jack Daniel's bbq pulled pork (thaw if frozen)
4 c. frozen cubed hash brown potatoes - I omitted these and poured the stew over cooked elbow macaroni
3 (14 1/2 oz) cans diced tomatoes wtih garlic and onions
1 (14 1/2 oz) can corn, drained
1 (14 1/2 oz) can cream-style corn
1/2 c. bbq sauce - I omitted this since my pork recipe already contained bbq sauce
1 tbsp hot sauce
1 1/2 tsp salt - I omitted
1/2 tsp pepper
2 c. frozen lima beans - I omitted but would make a great addition to the stew
The original recipe calls for mixing these ingredients together in a large stock pot. Bring the stew to a boil, and then simmering for 45 minutes, stirring often.
However, I stirred all of the ingredients together in my 6 qt. crockpot and cooked it for 2 hours on low and then for 2 hours on warm.
Serve with warm cornbread.

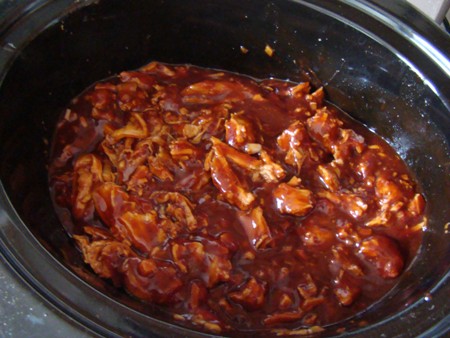
Jack Daniel's BBQ Pulled Pork

The idea to create my own bbq pulled pork came from a trip to Sam's Club on our shopping trip for July 4th. Sam's was full of sample givers that day. My kids couldn't wait to get in there to sample all of the foods - funny how they will try foods during this time that they wouldn't normally try at all!
One stand was handing out bites of prepacked Jack Daniel's bbq pulled pork. My kids and even my normally really picky husband all liked it. (maybe the samples work on husbands, too?). I thought that I was good but I couldn't get over the fact that the meat was minced beyond recognition. I cannot stand to eat bbq like this. I like to be able to recognize the meat that I am eating. My husband challenged me to find a recipe that would compare to the taste of the bbq on the minced meat sandwich bites that they were scarfing down.
I searched through many cookbooks at home and at the library, through magazines and on the Internet. I finally found a recipe called "Jack Daniels BBQ Sauce" on the Budget 101 forum by someone with the username BiggerPiggyBank. The recipe calls for simple ingredients cooked together to create a homemade bbq sauce. I think that double cooking it - once on the stove as called for in the recipe and then again in the crockpot on make the pulled pork, really deepens the flavors. I truly believe that this is one of the best bbq sauces that I have ever tasted. **Note** This sauce is on the sweeter side. If you like a vinegar based sauce, I wouldn't suggest this one.

Jack Daniels BBQ Pulled Pork
4-5 lb pork tenderloin, cut in half
1 c. chicken broth
1 recipe for Jack Daniels BBQ Sauce (below)
onion buns
You will need a large crockpot for this recipe. I used a 6 qt. oval crockpot.
Add the pork tenderloin to the crockpot.
Pour 1 c. of chicken broth into the crockpot.
Cover and cook for 3 - 4 hrs. on high. After 3 hrs,., check to see if the pork is done by using two forks to"pull" it apart. It should fall apart easily. If not, continue cooking until the pork has been cooked though. My tenderloin cooked for about 3 1/2 hours.
Remove the pork to a cutting board and shred the entire loin using two forks. My preference is to leave the pork in big pieces. You can also chop it into smaller bits if you prefer.

Drain the broth from the crockpot. Return the pulled pork to the crockpot. Cover with the Jack Daniels bbq sauce and stir to mix well. Cook on low for 2 hrs to blend the flavors. Keep warm until ready to serve.
Serve the bbq pulled pork on onion buns.

Jack Daniels BBQ Sauce
from user BiggerPiggyBank@Budget101 forums
my version in bold text
1/2 lg onion, chopped
4 cloves garlic, chopped - I used 4 tsp minced garlic
2 c ketchup
1/3 c vinegar
1/4 c worcestershire sauce
1/2 c brown sugar, packed
3/4 c molasses
1/2 tsp pepper
1/2 tbsp salt
1/4 c tomato paste
2 tsp liquid smoke - I used mesquite flavor
1/2 ts tabasco sauce, to taste - I used 2 tbsp
Burbon or whiskey -- to taste - I used 2 tbsp Jack Daniels Whiskey
(In my own words) Combine onion, garlic and whiskey frying pan. Saute onions and garlic.
Combine remaining ingredients, bring to boil, and then simmer for 20 minutes, stirring occasionally.
This recipe makes 4 cups. I doubled this recipe and used all of it to cover the pulled pork.
Before serving, spoon approximately half of pulled pork into another container to use for another meal. It is delicious when used in this recipe for Brunswick Stew. Can be frozen in a tightly sealed container.
Monday, July 18, 2011
Our Menu for July 17 - 23
Better late than never with a menu plan, right?
Sunday - stacked tortilla pie with a side of rice
Monday - ravioli and garlic bread
Tuesday - crockpot chicken tetrazinni and green beans
Wednesday - grilled turkey burgers, pierogies and corn
Thursday - my MIL's goulash (making in the crockpot)
Friday - margarita chicken, rice and spinach/carrots for those who don't like spinach
Saturday- manicotti, salad and garlic bread
** For a wonderful dessert at the end of the day, try these**
Orange Berry Cake
Blueberry Bliss Pudding
No Bake Chocolate Covered Peanut Butter Balls
Chocolate Chess Pie
Linking up to:
Menu Plan Monday
Secret Recipe Club: Orange Berry Cake

I can't believe that another month has flown by so quickly. It's time for another round up for the Secret Recipe Club. I'm baking from Alessio's blog, Recipe Taster. His blog features beautiful pictures and recipes. Many of his recipes stem from his Sicilian background. Delizioso!
When I saw his recipe for Orange Cake, I knew right away that I wanted to try it because I love the fresh taste of oranges in cakes and pastries. I will admit that some worry and nervousness set in when it came time to convert the recipe from grams to the American equivalents. I don't own a kitchen scale so I knew that I was going to have to rely on any Internet findings to get me through this time. You can imagine my surprise when I realized that there were no exact conversions for this measurements in this recipe. I decided to wing it anyway and I must say, I'm so happy that I did. This was a truly delicious cake. It was very light and moist, showered with a wonderful orange flavoring. The orange zest hits it out of the park. Do not even be tempted to leave it out.
Alessio shows several different ways to decorate the cake on his blog but I choose to use a low sugar real berry jam as a glaze for the top of the cake, along with a sprinkling of orange zest on top.

So simple and pretty! It pairs perfectly with a cup of herbal tea. The recipe will definitely go into my "favorites" pile.
Orange Berry Cake
adapted from the blog: Recipe Taster
7 tbsp. butter, softened
1/2 c. granulated sugar
zest of 3 lg. oranges
1 lg. egg yolk
2 lg. eggs
1 3/4 tbsp. canola oil
1/2 c. 100% real orange juice
1 c. all purpose flour
1 3/4 tsp baking powder
4 heaping tbsp. low sugar real berry jam
zest of 1 orange for decoration
Preheat oven to 350*. Grease and flour a 9 inch or 10 inch spring form pan and set aside.
I would recommend using a stand mixer for this recipe, although it could be mixed with a hand mixer.
In the bowl of your stand mixer, add the butter and beat until light and fluffy. Gradually add the sugar to the butter and beat until no longer grainy and the mixture is light and fluffy.
Mix in the orange zest from 3 oranges.
Add egg yolk to the mixture and beat until combined. Add eggs, one at a time, and beat until everything is mixed together and looks smooth and creamy.
With the beaters still running, stream in the canola oil. Mix well.
Alternate pouring the flour and the orange juice into the wet mixture in the bowl. Mix well after each addition.
Spoon the batter into the spring form pan. Tap the pan on the counter top to release the air bubbles in the batter.
Bake for 20 - 25 minutes. My cake was perfectly baked at 22 minutes.
Allow the cake to cool in the pan for 10 minutes before inverting it onto a cake platter.
Melt 4 heaping tbsp. low sugar real berry jam in the microwave or on the stove top. Using a pastry brush, gently brush the melted jam over the top of the cake.
Sprinkle the zest of 1 orange over top of the jam.
My husband and kids, as well as I, really enjoyed this cake so I can't tell you what to do with any leftovers. I would imagine that the cake tastes the best if eaten the same day it was baked.

Time to gear up for next month's Secret Recipe Club event! Click here from more info. on how you can join in on the fun!
You just can't help but to drool over all of these beauties below. We love comments! Let us know what you think!!
Friday, July 15, 2011
Blueberry Bliss Pudding

I found this recipe while searching through some old issues of CBS WATCH magazine. It's a family recipe handed down in Sara Canning's (The Vampire Diaries) family. In her interview, she mentions that it's a family tradition to make the blueberry pudding during the holidays in Newfoundland.
It reminds me a lot of my MIL's recipe for apple pudding. Don't get it confused with bread pudding, it's not. It's more of a cake with fruit baked in it. One major difference between the apple pudding and the blueberry pudding is that the apple pudding doesn't have a sauce that gets poured over it. In the original recipe, the sauce calls for brandy and lemon extract. I made some changes adding more vanilla for the lemon extract and fresh squeezed orange juice for the brandy. I liked the sauce on the blueberry pudding but it would also be really delicious omitting the syrup and serving it with warmed, sweetened cream or topped with ice cream.

Blueberry Bliss Pudding
adapted from CBS Watch! Magazine
1/2 c. butter. softened
1/2 c. sugar
2 eggs
1 c. flour
2 tsp. baking powder
1 tsp. vanilla
1/2 tsp. salt
1 1/2 c. fresh blueberries
1/2 c. water
Heat oven to 325*.
Cream butter and sugar.
Add eggs one at a time, beating until fluffy.
Add flour, baking powder, vanilla and salt.
Stir in enough water (up to 1/2 c.) to make the batter fluffy. (I only used 1/4 c. water).
Fold in blueberries. Pour the batter into a greased 9 x 9 baking dish. Bake for 45 minutes or until nicely browned and a toothpick stuck into the middle of the pudding comes out clean. While baking, prepare the sauce.

Sauce for Blueberry Bliss Pudding
3 tbsp. butter
2 c. hot water
1/8 tsp. salt
3 tbsp. brown sugar
2 tsp. vanilla
2 tsp. fresh squeezed orange juice
2 tbsp. cornstarch mixed with a little cold water
1/8 tsp. vinegar
1/2 fresh blueberries
Stir all ingredients together in a pot. Bring to a boil. Using a potato masher or a fork, smash the blueberries into the sauce and continue cooking until it starts to thicken.
Using a the handle of a wooden spoon, poke holes into the pudding.

Pour the sauce over the pudding. Serve warm.
Tuesday, July 12, 2011
No Bake Chocolate Covered Peanut Butter Balls & Our Weekly Menu Plan

This summer seems to be flying by! We are in the middle of an incredible heat wave. I've been holed up in the house with the AC for a few days, finally dragging myself and the kids out to go grocery shopping.
My kids and husband have grown accustomed to eating some sort of dessert in the later evening, right before my husband leaves for work. While I love providing homemade desserts, I hate the thought of turning on the oven to heat it up in here. Thus, this batch of no bake peanut butter balls. Takes just 4 ingredients and a kid or two willing to get their hands messy and you're ready to go!

No Bake Chocolate Covered Peanut Butter Balls
1-18 oz. jar of smooth or chunky peanut buter - I prefer smooth
1 - 16 oz. bag of confectioners sugar
1/4 c. butter, melted
chocolate almond bark
or
chocolate candy melts
or
12 oz. semi-sweet chocolate chips & 2 tsp. shortening
In a large bowl, stir together the peanut butter, confectioners sugar and melted butter until the mixture is crumbly. For the next step, the best way that I've found to make a smooth filling is to use your hands to mix everything together.
Line a baking sheet with foil. Roll the peanut butter filling into 1 inch balls and line the baking sheet with rows of the balls. Set the baking sheet in the freezer for 5-7 minutes to chill the peanut butter balls for easier dipping.
While the peanut butter balls are chilling, melt the chocolate in the microwave in a microwave safe bowl that is deep enough for dipping. I melted 6 blocks of chocolate almond bark at a time, stirring at 45 second intervals until smooth.
Remove the baking sheet from the freezer. Insert a toothpick or wooden skewer into a peanut butter ball and then dip it into the chocolate, turning quickly to cover the entire candy. Place onto a second baking tray that has also been lined with foil. Swirl the chocolate on the top of each candy for a pretty design. Refrigerate until the chocolate had completely dried.
Store the candies in a sealed container in the refrigerator.
**Warning** These little candies are very addictive!!
Weekly Menu Plan for July 10 - 16
Sunday - country chicken and vegetables in the crock pot
Monday - crock pot Jack Daniel's bbq pulled pork sandwiches - homemade Jack Daniel's bbq sauce!
Tuesday - bacon, lettuce and tomato jam sandwiches, cottage cheese and cucumber salad
Wednesday - breakfast for dinner: pancakes, scrambled eggs, sausage and biscuits
Thursday - Brunswick stew using leftover pulled pork and corn bread
Friday - grilled chicken and pasta with lemon basil sauce
Saturday - burrito pie and rice
Stay cool!
I'm linking up to:
Menu Plan Mondays
A Bowl Full of Lemons
The Goose Berry Patch Blog
Wednesday, July 6, 2011
Garlic Asiago Chicken and Noodle Casserole

I've been doing some sorting and organizing of my huge stack of magazines that is taking up a lot of space in our little apartment. I'm sorting into 3 boxes - one for recipes that I want to keep, one for magazines that are full of too many recipes, tips and crafts to get rip apart the whole thing, and one box that holds that magazines that are going to be donated to our local thrift store. (Hopefully I will remember them and not buy them back!)
I'm going to be trying out some of these recipes for the next few weeks so that I can weed through the pages even more, keeping the ones that we like and ditching the rest.
The first recipe to be tested was the Chocolate Coconut Bars that I baked a couple of days ago. I will be keeping this one. It's moist and delicious with a great pairing of chocolate and coconut.
Next up is tonight's dinner, Garlic Asiago Chicken and Noodle Casserole. It's my take on Garlic Parmesan Chicken and Noodles from an April 2010 Better Homes and Garden magazine. Of course I made more of the recipe that what it said. The original recipe makes 4 servings but that's not enough for my hollow-legged son and the rest of us plus enough for leftovers for my husband's lunch.

I made some substitutions and changes to the recipes, the most obvious being the cheeses that I used. My version of this recipe is below.
Garlic Asiago Chicken and Noodle Casserole
adapted from an April 2010 Better Homes & Garden
magazine recipe
18 oz cooked egg noodles - keep warm after cooking
2 lb chicken, cut up into pieces - I cooked extra chicken
thighs and legs on July 4 so that I would have extra for
this meal
4 tbsp minced garlic
1 small can of diced mushrooms, drained
5 1/4 c. whole milk
2 c. shredded Asiago cheese
2 1/2 c. shredded mozzarella cheese + 1 c. shredded mozzarella
1 tbsp sage
1 tsp nutmeg
2 tsp black pepper
1 tbsp poultry seasoning
Preheat oven to 450*
To a large pot, add chicken, mushrooms and milk. Cook on medium heat until heated through.
Stir in Asiago cheese and 2 1/2 c. mozzarella cheese. Stir until smooth. Add noodles and stir to coat - the sauce will be thin, not a cheese sauce consistancy.
Pour the chicken and noodles into a large baking dish. Sprinkle the reserved cup of mozzarella cheese on top of the noodles.
Bake for 20 - 30 minutes or until the chicken and noodles start to lightly brown.
*****
My thoughts on this dish: Both of my kids liked this dish. They had no complaints about it. My husband and I thought that it was just ok. Just another noodle casserole and sort of bland at that. If you tend to like casseroles that contain a mild cheese flavor and don't contain a lot of spices, you would probably like this one. Would I make this again, probably not...at least not without add more flavor to it. At that point, it would be probably be another casserole completely. There's nothing wrong with this casserole. It just didn't excite my taste buds.
Monday, July 4, 2011
Chocolate Coconut Bars

If you love the combination of coconut and chocolate, you must try Family Circle's latest recipe for Chocolate Coconut Bars. You can find it in the July issue of Family Circle or you can access the recipes on the website by signing up for their free newsletter.
The bars are sort of a cake/brownie combination. Of course, when it comes to spices and extracts, I often add more than what's called for in a recipe because I like a denser flavor. I did this with the icing recipe for these bars. The recipe calls for 1/4 tsp. of coconut extract. This left the icing with barely a hint of coconut flavor. I added 2 more tsp. of coconut extract, plus 1/4 of powdered sugar to soak up the added liquid. This amount was perfect. It's a nice coconut flavor but not overwhelming and paired nicely with the chocolate bars.
I would imagine that you could freeze the bars with no problem - they won't last long enough in our house. I have to add an * here, though. Instead of using a 9 x 13 pan as called for in the recipe, I used a smaller 8 x 10 pan, making the bars a littler thicker. I cut the bars into 15 pieces.

Chocolate Coconut Bars
adapted from Family Circle Magazine - July 2011
Ingredients
1 cup (2 sticks) butter
4 squares (1 ounce each) unsweetened chocolate, broken up
1 1/2 c. sugar
1 1/2 c. flour
4 eggs
1/2 tsp baking soda
1/4 tsp salt
1/2 tsp coconut extract
1 c. sweetened flake coconut
1/2 c (1 stick) unsalted butter, softened
2 c. confectioners' sugar
2 1/4 tsp coconut extract
Heat oven to 350*.
Line a 8 x 10 baking pan with foil. (9 x 13 can be used). Spray the pan with nonstick cooking spray.
Make Bars:
Combine butter and chocolate in a microwave-safe bowl and microwave for 1 minute. Stir. Microwave another minute and stir. Microwave for 30 seconds more and stir until smooth.
Stir in sugar, flour, eggs, baking soda, salt and coconut extract. Pour into prepared pan; smooth top.
Bake for 30 minutes. Watch carefully and check often so that you do not over bake the bars.
Remove pan and sit on a cooking rack.
Prepare Topping:
Spread coconut on a baking sheet and bake at 350* for 10 minutes or until golden.
In a large bowl, combine butter and powdered sugar. Beat until smooth. Beat in coconut extract and 2 tbsp water. Stir in up to 1/4 c. extra powdered sugar to make a thick icing.
Spread over partially cooled bar and top with toasted coconut. Cover with plastic wrap or a tight fitting lid. Refrigerate until completely cooled.
Set the bars on the counter 15 - 30 minutes before serving . Cut into small squares.
Refrigerate any leftovers.
The pièce de résistance, however, was scooping up a bite of the coconut bars along with a bite of creamy, homemade chocolate ice cream. Heavenly! (chocolate ice cream recipe coming soon!)

Saturday, July 2, 2011
June '11 Cookie Carnival Round Up

Time again for our monthly Cookie Carnival Round Up!
June brought us these two different cookie recipes to choose from:
Chewy Peanut Butter Cookies from Smucker's
and Lemon Tea Cookies from Betty Crocker
Both recipes went over big with our bakers this month!
Check out our bakers and what they had to say about the cookies....
Lisa@Gourmified made lemon tarts from the lemon cookie recipe. She said "I decided to use my mini tart pan and make some lemon tarts instead of cookies. They very very closely resemble a lemon bar, which I love, just with a slightly thicker crust."

Juliana@horneandoalgo made the lemon tea cookies of which she said "A delicious lemon cookie, very colorful and ideal for afternoon tea."

Christine@whimsicalbakery made key lime tea cookies. She said that her cookies really turned out tangy. Be sure to check out her new redesigned blog. It's pretty!

Vivian@Letstrythese made the lemon tea cookies. She said that although the cookies are somewhat fragile, they were still tasty. She gave a great tip of baking the cookie half way and then filling it, rather than doing it prebaking.

Julie@littlebitofeverything made the chewy peanut butter cookies. Like me, she has memories of crisscrossed peanut butter cookies. She loved this new recipe and said " You'll keep reaching in the cookie jar for more!"

Donna aka my friend "Trainlady" baked along with the Cookie Carnival this month. I've known Donna for several years through FamilyCorner.com. She baked both cookies and shared them with her neighbor Dorothy. Donna said "I made both cookie recipes this month. Dorothy, who loves anything sweet especially loved the lemon filled cookies. She is my dear neighbor who just turned 92 in May. I made the peanut butter cookies, too, and froze them to take on our camping trip. They held up real well after being frozen and were so yummy! The peanut butter cookies were MY favorite!"
Here's Donna and her peanut butter cookies!

This is the lovely Dorothy holding the lemon tea cookies.

Here are my cookies....
I baked the chewy peanut butter cookies. Even though my cookies spread out and didn't look so pretty, they tasted really good! We'll be making them again!

and rounding up this month's recipes is
Katrina@BakingandBoys made the chewy peanut butter cookies. She said "Loved these chewy peanut buttery coconutty oaty cookies!"

Thanks ladies for a GREAT round up this month! Thank you for baking along with me!
We love comments!! Please take a couple of minutes to let us know what you think of our cookies!
Want to join in on the fun? Here's what you need to know.
Cookie Carnival - Chewy Peanut Butter Cookies

I grew up eating only one kind of peanut butter cookie - my mother's homemade recipe. She would make them for Christmas and Easter and any other family get-togethers we might have during the year. I remember helping her bake and scooping out the peanut butter - always JIF! I remember how she would take the time to criss cross each cookie with a fork so that the lines were just perfect - and I imagine that she still does the same thing. Mom, if you're reading this, your cookies have definitely left good memories!! Those cookies were sort of crisp on the outside, yet sort of soft on the inside. A perfect cookie for dunking in milk or coffee. I don't make those cookies here at my house because my dh and kids really don't like plain peanut butter cookies. But I can instantly snap back and remember what they tasted like when she tells me that she just baked a batch of them.
When I found this recipe called Chewy Peanut Butter Cookies and saw that it called for coconut and oats and that it was a soft, chewy cookie, I thought that I might be able to pass this off to my family. I thought that it would be the perfect cookie to try out in the Cookie Carnival. Since it was June, I knew that many kids, including mine, would be out of school so I was hoping that it might pique their interest into getting into the kitchen!
Well, it worked. My kids helped with baking these cookies and all of us ended up really liking them. I love Smucker's Natural Peanut Butter but I didn't have any on hand so I subbed regular creamy peanut butter. I think that using the regular peanut butter instead of natural added more oil to the mix, thus making them spread more. My cookies turned out to be really thin (and not too pretty) but they tasted great!

Chewy Peanut Butter Cookies
adapted from Smucker's website
1 cup sugar
1 cup firmly packed light brown sugar
1/2 cup butter, softened
3/4 cup smooth, creamy peanut butter
2 large eggs
2 tablespoons milk
1 teaspoon vanilla extract
1 cup flour
1 teaspoon baking powder
1 teaspoon baking soda
1 1/2 cups quick rolled oats
1 cup flaked coconut
Preheat oven to 350*.
Beat sugar, brown sugar, butter and peanut butter until creamy. Beat in eggs, milk and vanilla. Mix well. Combine flour, baking powder and baking soda; stir in rolled oats and coconut. Add to peanut butter mixture and beat on low speed until well blended. Cover and chill 30 minutes.
I used a large ice cream scooper to drop mounds of the cookies onto ungreased cookie sheets. Bake 15 - 17 minutes or until light brown around edges. Cool 2 minutes before removing to wire rack to cool completely. If the cookies start to stick to the pan, return the pan to the oven for a minute to soften the cookies again. Remove from the pan immediately using a large, flat spatula.
Join the Cookie Carnival and bake along with me each month!

Subscribe to:
Posts (Atom)