It's moving day for us!
Hopefully I'll be back online by Friday evening. See ya then!
Please keep us in your thoughts that all goes well today and tomorrow!
Tami
Thursday, April 30, 2009
Tuesday, April 28, 2009
ABCs & 123s - Cookies for Teacher Appreciation Week
Teacher Appreciation week is May 3-9 this year.
Looking for something fun and tasty to give to your favorite teacher? Bake a batch of these cinnamon sugar cookies to say "Thank You" for all of their hard work.

What You Need
1/2 cup shortening (part butter or margarine)
1 cup sugar
1 egg
1 tsp. vanilla
2 2/3 cup flour
1 tsp. baking powder
1/2 tsp. baking soda
1/2 tsp. salt
1/2 tsp. cinnamon
1/2 cup sour cream
What You Do
Preheat oven to 425 degrees F. Mix shortening, sugar, egg, & vanilla thoroughly. Blend dry ingredients. Add to sugar mixture alternately with sour cream. Divide dough; roll out on a well-floured board. Cut with cookie cutters (metal cookie cutters w/ open tops are the easiest) You can make these as thick as you want... the thicker, the chewier.
Place cookies on lightly greased baking sheets. Bake 6-7 minutes or until very lightly browned around the edges. Remove to cooling racks to cool completely before icing.
Choose The Right Icing:
If you are planning on eating the cookies immediately and not storing them, you can frost them with confectioner's sugar icing. This quick and easy icing will harden slightly once it's on the cookies but will not harden enough to stack the cookies without ruining the designs on your cookies.
Confectioner's Sugar Icing:
2 cups powdered sugar
2 TBSP water
1/4 tsp. of flavored extract such as vanilla (optional). Make sure to use clear extract because any color will tint the icing.
If you are planning on packing the cookies in containers, I would recommend using this Royal Icing recipe. It takes a bit more work in the beginning but the end results are quite worth it when the cookies keep their "freshly made" appearance. This icing will harden to allow stacking in containers without ruining any of the cookie's designs.
Royal Icing:
1 1/2 TBSP meringue powder
2 cups sifted icing sugar
3 tablespoons cold water
Mix on low with a hand mixer for 10 minutes.
Decorating Cookies:
Divide icing into 3 bowls. Tint one bowl of icing green, one bowl red and one bowl blue. Decorate cookies and give ample time to air dry.
Freezing Cookies:
Line a baking sheet with wax paper, then lay cookies in a single layer onto the paper. Freeze. Once frozen, the cookies can be stacked on top of each other. To thaw, place cookies in a single layer on a baking sheet or plate-do not thaw cookies while they are stacked together or the icing will stick to the other cookies.
Thursday, April 23, 2009
Thrifty Thursday - my magazine craze

Ok, I admit it...To go along with my cookbook addiction, I'm addicted to collecting and reading magazines! Very rarely do I ever purchase a subscription to any magazine. Instead, I buy them at thrift stores and yard sales or once in a while I will get lucky and find some that someone has listed on Craigslist or FreeCycle for free.
My husband and I went hunting through our local Habitat for Humanity Restore today. I love wandering around places like that. I didn't find anything that I was looking for but I did get a great deal on 6 Southern Living magazines that are filled with recipes and decorating ideas that I can't wait to try. :)

I only paid $1.00 for all of them!
Magazines and good deals....that makes me happy!!!
This is my Thrifty Thursday deal of the week.
Here are more great Thrifty Thursday bloggings.
Wednesday, April 22, 2009
Earth Day Globe Cookies
Going green is an important lesson to teach the next generation. What a great way to share the importance of keeping our planet green by making these sweet Earth cookies together.

What You Need
1 1/2 C. white sugar
1 1/2 C. brown sugar
3/4 C. butter, softened but not melted
3/4 C. butter flavored shortening
3 eggs
1 1/2 tsp vanilla
1 1/2 tsp baking soda
1 1/2 tsp cinnamon
3/4 tsp baking powder
3/4 tsp salt
3 C. flour
4 1/2 C. regular (not quick cooking!) oatmeal
1 1/2 C. white chocolate chips (optional)
can add nuts if desired
What You Do
Preheat oven to 375 degrees F.
Cream together both sugars, butter, and shortening. Beat in eggs, one at a time, then add vanilla and mix well. Combine soda, cinnamon, baking powder, salt, and flour. Add slowly to the butter and sugar mixture making sure to mix well. Stir in oatmeal, and then add chocolate chips at the end.
Drop by scant 1/4 C. onto cookie sheet, leaving some room in-between cookies for the cookies to spread during baking.
Bake for 8-10 minutes or until light brown. Do not over bake if chewy cookies are desired. Immediately remove from the cookie sheet to a cooling rack.
Once cookies have completely cooled, frost with royal icing* to look like planet Earth.
Royal Icing
4 egg whites
4 C. sifted confectioners' sugar
1 tsp. clear vanilla extract
Beat egg whites in clean, large bowl with mixer at high speed until foamy. Gradually add sugar and clear vanilla extract. Beat at high speed until thickened. If you desire a thicker icing, slowly add more confectioner's sugar until you reached your desired consistency.
For "Earth" cookies you will need:
blue paste food coloring
green paste food coloring
3 Ziploc baggies or icing bags
Divide the icing into: 1/2 to color blue, 1/4 to color green and 1/4 white. Fill in green for land, blue for water and use the white to outline the land.
Let the cookies dry completely before stacking in containers.
More fun Earth Day kids' recipes.
More fun Earth Day craft and other ideas.
Tuesday, April 21, 2009
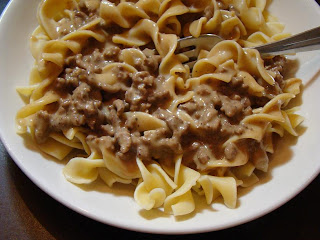
Hamburger Stroganoff
I needed a quick meal that included hamburger in the ingredients since that is what I had in our freezer that needed to be cooked. I didn't have enough hamburger for burgers and I wasn't in the mood for tacos, so I decided to search for something else. I finally decided on hamburger stroganoff. I didn't want to use cream-of-anything soup in it. After searching for a while, I decided to make up my own recipe. It was a really big hit with my family. YAY!

Hamburger Stroganoff
1 1/2 lb. hamburger
2 small cans of mushrooms, drained well OR
8 oz of sliced, fresh mushrooms - I would've used
fresh but I didn't have any on hand so I just used
canned.
onion powder to taste- again, I would've used diced onion
but my daughter hates onions and since she has a
mouthful of missing teeth, I wanted her to enjoy
eating without complaining all the way through
dinner. The onion powder did the trick.
garlic powder to taste
red pepper flakes (optional)
2 small cans of beef broth
cornstarch
Gravy Master
1/4 - 1/2 C. sour cream
1- 12 oz. bag of wide egg noodles, cooked and kept warm
Brown the hamburger and mushrooms together in a large frying pan. Drain off any excess fat, and then return the mixture to the frying pan.
Stir in 2 tsp. each of onion powder and garlic powder and 1 tsp. of red pepper flakes.
Pour in beef broth. Bring to a boil over medium heat.
Make a slightly thickened paste of cornstarch and 1/2 C. water - I didn't measure the cornstarch, I just kept adding it to the water until it was the consistency that I wanted. Slowly stir this mixture into the boiling broth until a gravy forms. You might not need to add the entire 1/2 C. of thickener.
Stir in 2 TBSP of Gravy Master.
At this point you need to do a taste test to see if you need to add more onion powder, garlic powder, red pepper flakes and/ or Gravy Master. I added a bit more of all of the above. Add it to your liking.
Cooking for 5 - 10 minutes to heat through.
Add egg noodles and stir together well. Stir in 1/4 - 1/2 C. sour cream, depending on your preference. I'm the only one who really likes sour cream so I only added 1/4 C. to ours....ssshhhh! I didn't tell them that it was in there.
Serve immediately. Crusty bread goes great with it!

Monday, April 20, 2009
Guest Hosting Bookmarked Recipes #50
Here’s this week's round up of Bookmarked Recipes and this week we have some more great recipes from some more great bloggers. This week’s round up is being hosted by me... Tami of Tami's Kitchen Table Talk.

I'll start off this week's round up with an old time favorite, Original Rice Krispies Treats, from the Kellogg's Rice Krispies website. Wanna bite?

Next up we have Arika of My Yummy Life. She's made Nanaimo Bars from Dishing Up Delights. Don't they look delicious?!?

City Girl of City Girl Lifestyle sent us her version of Spicy Red Rice. She bookmarked the recipe from the May 2009 issue of Real Simple Magazine. She sent us the online link for it, too. Looks really good!

Deeba from Passionate About Baking sent in this beautiful dish that she calls Getting My Herbs Right with Chicken and Pasta. She combined two bookmarked recipes to create this dish. The first recipe is from an old blogging friend, Val at More Than Burnt Toast & the second is from a new blogging friend, Bron, at Bron Marshall. My mouth is watering over this one!

Amanda from Amanda's Cookin' sent in Sesame Chicken. She bookmarked this delicious recipe from You Tube. Somebody hand me a fork, I want to dig right in!

Thanks everyone for your submissions!!! It's always exciting to see what people have been making and recreating as well as meeting some new bloggers.
Next week’s round up will be hosted by Ben of What's Cooking.
That's it for this week. Remember if you want to take part here's all you have to do....
1. Pick a recipe from a book/magazine/blog/website/tv show and make it. (Note you can only submit 1 recipe per week)
2. Blog about it
- include where you got the recipe in your blog post (including a link to their website if possible)
- include a link to this post or this blog in your blog post
- include the logo (see above) for Bookmarked Recipes in your blog post
- include a photo of your recreation on your blog post
3. Email bookmarkedrecipes[AT]gmail[DOT]com with the following information:
- Your name
- The name of your blog
- The URL of your blog
- The permalink for your entry
- A photo of your entry
- A note of where you got your recipe from
Sunday, April 19, 2009
Bookmarked Recipes - Rice Krispies Treats
 I've been cleaning out my cupboards trying to use up some of the extra baking supplies that have accumulated over the last few months. I came across a bag of mini marshmallows and I knew that there was half of a large box of Rice Krispies left over from my kids. Since I needed to make something for their school lunches anyway, Rice Krispies treats seemed to be the perfect answer.
It's been quite a while since we've eaten these treats. My daughter was so excited that I was going to make them for her. She's lost two teeth this weekend for a total of 3 missing now. Finding things that she can (and will) eat has been a bit tricky. lol!

I went to the Kellogg's website and followed the directions for the original Rice Krispies Treats. Nothing could be any simpler. :)
3 tablespoons butter or margarine
1 package (10 oz., about 40) regular marshmallows
- OR -
4 cups miniature marshmallows
6 cups Rice Krispies
1. In large saucepan melt butter over low heat. Add marshmallows and stir until completely melted. Remove from heat.
2. Add Kellogg's Rice Krispies cereal. Stir until well coated.
3. Using buttered spatula or wax paper evenly press mixture into 13 x 9 x 2-inch pan coated with cooking spray. Cool. Cut into 2-inch squares. Best if served the same day.
Store no more than two days at room temperature in airtight container. To freeze, place in layers separated by wax paper in airtight container. Freeze for up to 6 weeks. Let stand at room temperature for 15 minutes before serving.

I'm submitting this as a favorite Bookmarked Recipe this week!
Be sure to check back here tomorrow because I am hosting this week's round up!
It's not too late to join us this week! It's EASY & FUN!!
Here's what you have to do:
To take part here's what you do.......
1. Pick a recipe from a book/magazine/blog/website/tv show and make it. (Note you can only submit 1 recipe per week)
2. Blog about it
- include where you got the recipe in your blog post (including a link to their website if possible)
- include a link to this post or this blog in your blog post
- include the logo (see above) for Bookmarked Recipes in your blog post
- include a photo of your recreation on your blog post
3. Email bookmarkedrecipes[AT]gmail[DOT]com with the following information:
- Your name and where you're from
- The name of your blog
- The permalink for your entry
- A photo of your entry
- A note of where you got your recipe from
YUMMY!

Tuesday, April 14, 2009
Just easy meals for busy days
I apologize in advance to my blogging friends for this rant....
It's been a few stressful days for me. We are trying to decide "when" or "if" we are moving. I'm pretty sure we are going to. I should clear things up when I said before that we found a house--I should've said to rent, not to buy. Neither one of us are ready to lay down ties in this area just yet, so we are just renting for now. That leads me to say that I cannot believe how rude some people can be once they find out you are "renters". To some, they consider us the scum of the Earth. Unbelievable! We are living in this state - not by choice - but because my husband was laid off from his job working for a major airline. We moved here so that he could take another job and provide for our family. We left behind a house and all of our family and friends (except my true Internet friends!). But we trudged through and made it work. Our prayers were answered when he was called back to his other job BUT we weren't given the option to go home. Instead we moved to another area within this same state. With the economy the way it is today, we are so very thankful that he still has his job. He's been with this company for 19 yrs --but that doesn't mean a thing - we can be uprooted at any time. I'm not asking anyone to feel sorry for us. We chose this path and we are making it work for us and our family. I just ask that before you call us (insert demeaning adjectives here) renters, you find out the whole story. Or better yet....get to know us. You might just like these renters.
Moving on......
Dinners for the last week have been pretty simple so that's why I haven't taken pictures or bothered to blog about them.
A few dinners I've made:
cheeseburgers & pasta salad
chicken noodle soup
lasagna
turkey and noodles
spaghetti
I hope to get back to menu planning next week.
Sunday, April 12, 2009
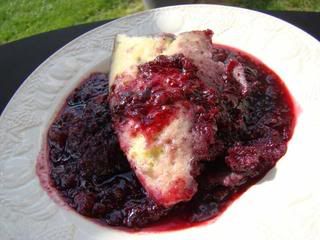
Berry Dumplings
My husband grew up with his Mom making dumplings in soups, desserts...etc. He was really happy when I told him that I found a recipe for a dumpling dessert.
The original recipe is called "Strawberry Dumplings", made by WendyMichelle at FamilyCorner.com.
I subbed mixed berries instead of using all strawberries. This was my first attempt at making any type of dumpling dessert so my dumplings weren't really pretty. Even so, the dessert was really good! The thought of dumplings cooked this way wasn't appealing to me at first but since I'm usually game for tasting everything that I make, I tried it. Boy was I surprised how much I liked it!
Here's my recipe with a couple of changes:
Berry Dumplings
4 eggs
4 Tbsp. melted butter
4 tsp. baking powder
4 tsp. sugar
1 tsp. salt
12 Tbsp. flour - I had to add 4 more TBSP of flour to make the batter stiff enough to spoon into the pot.
Combine to make stiff batter to hold shape.
4 cups
strawberries
2 cups sugar - I would only use 1 - 1 /2 C. of sugar the next time.
Mash berries with sugar. Bring to boil in a large pot
with a tight
lid. Drop dumplings into hot liquid, reduce heat and
simmer, with lid on, for 15 minutes. Don't lift lid - don't peek!
Remove dumplings carefully to dessert dishes and spoon berries
over.
A quick and easy dessert for any night of the week!
Kids Cook - Tropical Strawberry Smoothies
My kids really enjoy helping out in the kitchen. A couple of months ago I decided that we would set up one day each weekend for a "Kids Cook" day.
We've been really busy this weekend but we did manage to make smoothies together. Our local WalMart was giving out samples of smoothies on Saturday. Both of my kids liked it so we decided to make more at home. I already had the ingredients at home to make smoothies so I didn't have to spend the extra money on buying the ingredients. (YAY!)
Tropical Strawberry Smoothies
1 C. vanilla yogurt
1 C. fresh strawberries, sliced
1 C. frozen tropical fruit
1/2 skim milk
1 small banana, peeled and sliced
Add all ingredients in a blender. Cover and blend until smooth. Enjoy!

Saturday, April 11, 2009
Peanut Butter Meltaway Eggs
I made this recipe long before I started blogging and taking pictures of food. If you like peanut butter meltaways, these eggs are SO good! This recipe makes a lot of eggs but it can easily be cut in half.
Peanut Butter Meltaway Eggs
If you like peanut butter and chocolate you will want
to make a bunch of these meltaway eggs. They melt in your
mouth when you bite into them. For another taste treat,
try popping them into the freezer for a few minutes.
Yummy!
You need:
1 ½ lbs. white chocolate
2 oz. vegetable oil
1 lb. peanut butter
1 lb milk chocolate candy melts
plastic egg candy mold or
small, clean, plastic Easter eggs
drying rack or tin foil
fork or skewer for dipping eggs
candy sprinkles
Melt white chocolate in microwave, stopping every 30 seconds to stir. Stir in peanut butter until well mixed. Add oil and stir well for 2-3 minutes.
Pour peanut butter mixture into candy molds or fill each half of the plastic eggs. Set molds in freezer for 10 minutes or until mix is frozen solid.
Melt milk chocolate in the microwave. Using a fork or a skewer, dip the eggs into the chocolate then lay on a drying rack or tin foil to air dry. Sprinkle with candies while chocolate is still wet so that the candies will adhere to the egg.
Serve at room temperature for softer eggs. Can also be served frozen.
Optional: Peanut Butter Meltaway Bon Bons
To serve these delicious treats at times other than Easter, you can easily make them into bon bons.
Once you have mixed the peanut butter, chocolate and oil mixed together from the above recipe, pour the entire mixture into an 8x8 glass dish. Refrigerate until the mixture is solid—could take 2-3 hrs. Use a small ice cream scoop or melon ball scoop to scoop out the peanut butter mixture into ball shapes. Dip balls into melted milk chocolate and allow to dry on a baking rack. Sprinkle with candies if desired.
Monday, April 6, 2009
Crockpot Chicken Italiano
What a whirlwind weekend we've had! We've been looking for a house to move to that is bigger than our little apartment. On a whim, on Friday, we took a drive through a neighborhood that we hadn't considered before. We ended up finding a nice house. It's an old house with lots of charm. The owners have taken really good care of the house and have made the necessary updates along the way. We will be in a neighborhood with good schools - in fact, my son is so excited because their middle school is new! We are tired, but it looks like things might just have worked out for us. Time to pack and get ready to move! We are moving at the end of this month.
We had a lot of running around to do today so I threw dinner into the crockpot at 2:00 this afternoon. It's nice to know that at the end of a busy day that you have a hearty meal to sit down to.
I made my version of Crockpot Chicken Italiano:
1 - 8 oz package of sliced mushrooms
1 lg. can of italian tomatoes with Italian seasonings
3 TBSP minced garlic
1 lg. can of plum tomatoes
1 can of Rotel tomatoes, medium spice OR you can use spicy if you like it hot
3-4 frozen chicken breasts
1 can of corn, drained
2 cans of green beans, drained
Into a 5 qt. crockpot , stir together the first 5 ingredients. Drop in frozen chicken breast and stir well to cover the chicken. Cover with the lid and cook for 3 1/2 hrs. on high.
At this time stir in corn and green beans. Continue cooking for another 30 minutes to 1 hr. - depending on the size of the chicken breasts. The ones that I used weren't that big and were fully cooked at 4 hrs.
Once the chicken is fully cooked, remove the breasts to a plate and shred the meat using two forks. Stir the shredded chicken back into the crockpot.
This can be served alone, with fresh Parmesan cheese shredded on top, or over pasta or rice.

For dessert there's chocolate, chocolate and more chocolate. lol! We're having brownies (mix) and chocolate ice cream.
We had a lot of running around to do today so I threw dinner into the crockpot at 2:00 this afternoon. It's nice to know that at the end of a busy day that you have a hearty meal to sit down to.
I made my version of Crockpot Chicken Italiano:
1 - 8 oz package of sliced mushrooms
1 lg. can of italian tomatoes with Italian seasonings
3 TBSP minced garlic
1 lg. can of plum tomatoes
1 can of Rotel tomatoes, medium spice OR you can use spicy if you like it hot
3-4 frozen chicken breasts
1 can of corn, drained
2 cans of green beans, drained
Into a 5 qt. crockpot , stir together the first 5 ingredients. Drop in frozen chicken breast and stir well to cover the chicken. Cover with the lid and cook for 3 1/2 hrs. on high.
At this time stir in corn and green beans. Continue cooking for another 30 minutes to 1 hr. - depending on the size of the chicken breasts. The ones that I used weren't that big and were fully cooked at 4 hrs.
Once the chicken is fully cooked, remove the breasts to a plate and shred the meat using two forks. Stir the shredded chicken back into the crockpot.
This can be served alone, with fresh Parmesan cheese shredded on top, or over pasta or rice.
For dessert there's chocolate, chocolate and more chocolate. lol! We're having brownies (mix) and chocolate ice cream.
Thursday, April 2, 2009
Thrifty Thursday Tip: Drink More Water!
 No, I don't mean drink more of the so-called fancy, shmansy bottled water! (which is usually not that fancy after all) I mean plain ol' tap water. That's right...stick a glass under the kitchen faucet and turn on the water. Now, if you just can't stand the taste of the tap water in your house, buy a water filter for the faucet. In the long run, you will be saving a lot more money than if you were to keep buying bottled water and you will keep the plastic bottles out of the landfills.
Now, I will admit it...I don't drink nearly as much water as I should. I drink 3 or 4 -8 oz. glasses a day. I'm aiming for more yet again.
Besides saving money, drinking water is great for your health.
Here are 10 reasons why you should drink more water:
- Get Healthy Skin
- Flush Toxins
- Reduce Your Risk Of Heart Attack
- Cushion And Lube Your Joints And Muscles
- Get Energized And Be Alert
- Stay Regular
- Reduce Your Risk Of Disease And Infection
- Regulate Your Body Temperature
- Burn More Fat And Build More Muscle
- Get Well
To keep yourself motivated, go out and make 2 purchases -
1. a sporty or unusual, well-made water bottle. Look for one that is made out of a material that won't break if it is dropped or knocked over. Big or small, bright colored or weird shaped...whatever catches your eye and makes you want to carry it.
2. a fun glass or cup for each season or holiday - hit the dollar stores, Target or Walmart to look for their selection of fun summer drink ware. Buy something that's a little zany, something that makes you smile when you look at it. You are more apt to use it this way! Make a promise to yourself to only drink water out of it. It's much more fun to drink water out of a hot pink flamingo cup than it is to drink out of a plain old boring white plastic cup.
Here is a handy gadget to help you remember how much water you've had to drink. It's more clever than my hairbands-around-the-water bottle-system that I use now--albeit, not as thrifty! **I wrapped 10 hairbands around my (free) water bottle. I start off in the morning with all of the hairbands at the top of the bottle. Every time I drink 1 cup of water, I move a band to the bottom of the bottom.
If you don't like the taste of plain water, add a couple of slices of fresh lemon or orange to the glass. MMM!! Make pretty ice cubes by adding fresh raspberries or blueberries to the tray before filling it.
Won't you join me in a tall glass of water now?

Look here to see more Thrifty Thursday tips at Amanda's Cookin.
Subscribe to:
Posts (Atom)